[vc_row disable_element=”yes” height=”medium” color_scheme=”” us_bg_color=”” us_text_color=”” us_bg_image=”” us_bg_video=”0″][vc_column][vc_tta_tour][vc_tta_section active=”1″ title=”Overview” tab_id=”1520382095055-49440861-788a”][vc_row_inner][vc_column_inner][/vc_column_inner][/vc_row_inner][/vc_tta_section][vc_tta_section title=”Preparing Product Photos” tab_id=”1546910692410-c703f57b-4293″][vc_column_text]Click here to open documentation for preparing images in Photoshop (PDF download)[/vc_column_text][/vc_tta_section][vc_tta_section title=”Installation” tab_id=”1541596788459-6f0904d8-1799″][vc_column_text]To upload the Custom Product Builder plugin to your magento store you should:
1) download it from git.buildateam.io, and then open a command line, where you should write the direction for your magento folder and ‘setup:upgrade’ and click enter ![]()
2) After the process finished write the second command: ‘deploy:mode:set production’ ![]() ,click enter and wait till the end of compilation.
,click enter and wait till the end of compilation.
3) After it successfully ended you should go to the admin panel of your magento store  , enter the login and password, and you will come to the main page.
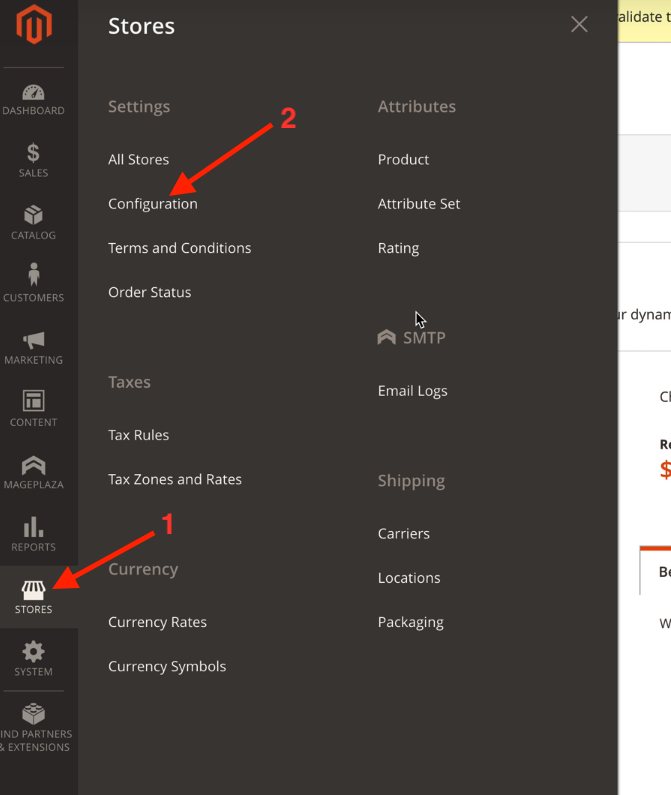
4) There you should go to ‘stores’ on the left menu (1), and click on ‘configuration’ button in the settings menu (2)
5) Make sure that Product Builder is installed successfully, you will see it in that page

You can also see the video instructions for installing The Custom Product Builder plugin for your magento store:
[/vc_column_text][/vc_tta_section][vc_tta_section title=”Export & Import Configuration” tab_id=”1511186502662-a3834876-dbe7″][vc_row_inner][vc_column_inner][vc_column_text]
Export Custom Product Builder configuration
You can export created product configuration in Admin Panel Catalog/Products by clicking on «Export» button in «Custom Product Builder» field.
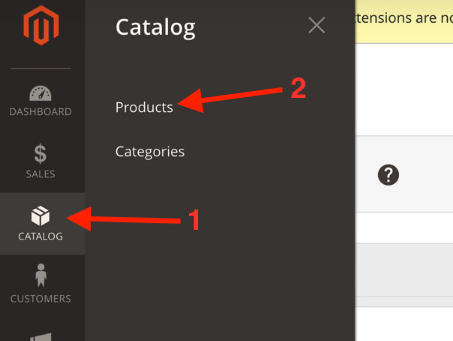
1) you should go to ‘catalog’ on the left menu (1), and there select ‘products’ button (2).
2) You will see a list of your products, and then you should press the ‘edit’ button on the right of the product 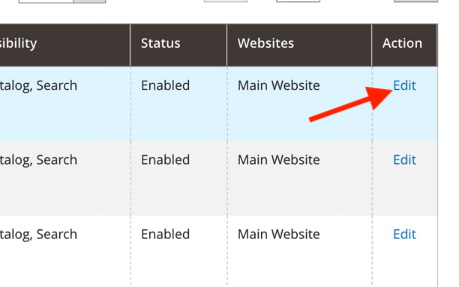
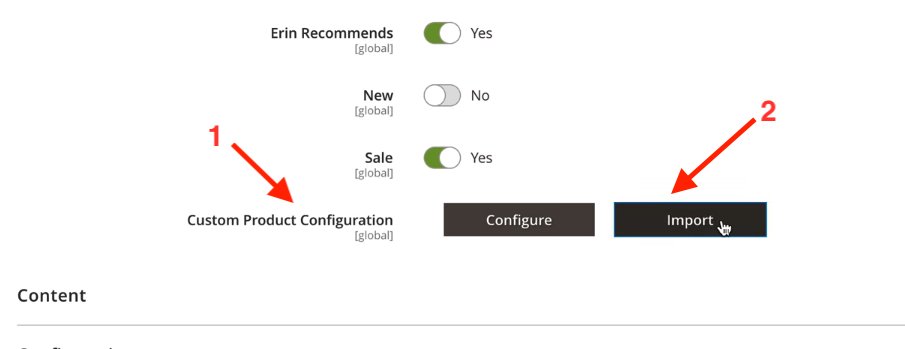
3) You will see the settings of the chosen product. After that you should scroll down till you find the ‘Custom Product Configuration’ option (1), and then click on ‘import’ button (2) and select the file of the product which you’d like to import and click open. After that please wait some time for product to be loaded. After the load finished you will see the appeared third button of export .
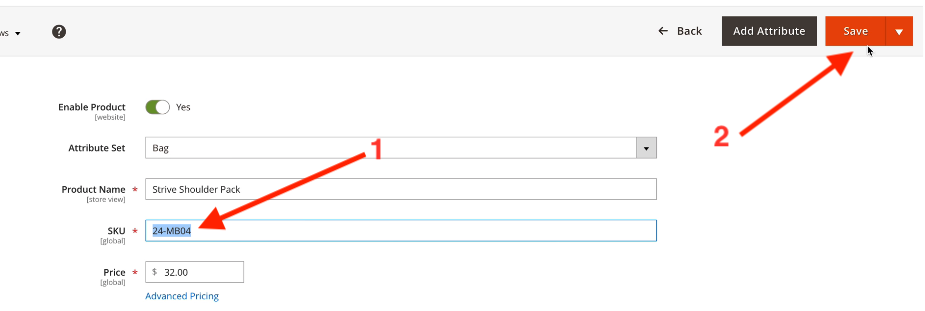
4) Copy SKU of the product – you can see it almost on the top of the list of options (1), and then press save button on the left (2).
5) After that go to your magento store, and in the search bar paste the SKU you copied.
This is an example of exported JSON file:
{“settings”:{“isAdmin”:true,”theme”:{“id”:”alpine-white”},”views”:{“front”:true,”back”:false,”left”:false,”right”:false,”top”:false,”bottom”:false},
“currentView”:”front”,”currentTab”:0,”defaultView”:”front”,”viewControls”:”arrows”,”hasSummary”:true,”layout”:”col-tabs”,”custom”:{“js”:””,”css”:””},
“defaultOptions”:{},”cdnPath”:”https://magento.thecustomproductbuilder.com/media/”,”currency”:”USD”},
“data”:{“name”:null,”base”:{“price”:null,”image”:{“front”:”blob:https://magento.thecustomproductbuilder.com/dc563d64-112f-40af-bca8-bb9a6fd6a93a”}},
“panels”:[{“id”:”zNlxQyvJG1AJWrZiUvOkAfLz”,”categories”:[{“id”:”qxzG5v9vUY8jK6oJD1HtqHvF”,”zIndex”:1,
“type”:”text”,”options”:[{“preview”:{“type”:”img”,”data”:{“front”:null,”back”:null,”left”:null,”right”:null,”top”:null,”bottom”:null}},
“option”:{“data”:{“label”:”Maple”,”value”:”100″}},”price”:”0100″,”inStock”:true,”logic”:{“rules”:[],”action”:”hide”},”id”:”m9bWDxXoVIYVzpvmZdR1SOTp”},
{“preview”:{“type”:”img”,”data”:{“front”:null,”back”:null,”left”:null,”right”:null,”top”:null,”bottom”:null}},”option”:{“data”:{“label”:”Ash”,”value”:”50″}},
“price”:0,”inStock”:true,”logic”:{“rules”:[],”action”:”hide”},”id”:”AA_Sud03Y5zwseKovI6bQnDB”}],”title”:”Maple”,”description”:””,”clearNext”:””,”logic”:{“rules”:[],”action”:”hide”}},{“id”:”WS0HXzoi1l78IZj4Vghw0y83″,”zIndex”:1,”type”:”text”,”options”:[],”title”:”Ash”,”description”:””,”clearNext”:””,”logic”:{“rules”:[],”action”:”hide”}}],
“title”:”Finish”,”description”:””,”logic”:{“rules”:[],”action”:”hide”}},{“id”:”xiHEOjpHEkAaR4awCFM9SBBJ”,”categories”:[],”title”:”hardware”,”description”:””,
“logic”:{“rules”:[],”action”:”hide”}}],”layers”:[{“panel”:”base”,”category”:”base”,”option”:”base”,
“preview”:{“front”:”blob:https://magento.thecustomproductbuilder.com/dc563d64-112f-40af-bca8-bb9a6fd6a93a”},”price”:null,”zIndex”:1},
{“panel”:”zNlxQyvJG1AJWrZiUvOkAfLz”,”category”:”qxzG5v9vUY8jK6oJD1HtqHvF”,”option”:”AA_Sud03Y5zwseKovI6bQnDB”,
“preview”:{“front”:null,”back”:null,”left”:null,”right”:null,”top”:null,”bottom”:null},”value”:”50″,”price”:0,”zIndex”:1}],”customLayers”:[{“id”:”rrfrGN7dXyL8eNfY16EaxaeI”,
“title”:null,”position”:{“x”:0.5,”y”:0.5},”selectPanel”:null,”points”:[{“x”:0.4,”y”:0.6},{“x”:0.6,”y”:0.6},{“x”:0.6,”y”:0.4},
{“x”:0.4,”y”:0.4}],”value”:null,”view”:”front”,”type”:”path”,”hoverColor”:false,”zIndex”:1,”logic”:{“rules”:[],”action”:”hide”},”active”:false},
{“id”:”F5GcUDgpsNwv_tGU6LzoieX8″,”title”:null,”position”:{“x”:0.5,”y”:0.5},”selectPanel”:null,”points”:[{“x”:0.4,”y”:0.6},{“x”:0.6,”y”:0.6},{“x”:0.6,”y”:0.4},
{“x”:0.4,”y”:0.4}],”value”:null,”view”:”front”,”type”:”path”,”hoverColor”:false,”zIndex”:1,”logic”:{“rules”:[],”action”:”hide”},”active”:true}],
“price”:0,”isFetchingCategories”:true}}
Import Custom Product Builder configuration
- From Admin PanelGo to Catalog/Products, choose product (or add new one).
In «Custom Product Builder» field click on «Import» button, specify a path to JSON - From command linecurl -X POST –data @<(cat <path/to/json/file>) http://cpb.loc2/customproductbuilder/product/import/id/3
[/vc_column_text][/vc_column_inner][/vc_row_inner][/vc_tta_section][vc_tta_section title=”Configure products” tab_id=”1511185246469-586b852c-675e”][vc_column_text]
In Admin Panel Catalog/Product add new product. By clicking on «Configure» button you can configure your custom options by adding new panels, categories and options.
 [/vc_column_text][/vc_tta_section][vc_tta_section title=”Printable Areas” tab_id=”1546910634212-f09ca98b-f93d”][vc_column_text]Printable areas (for promotional products)
Printable Areas offer an ability to add images and logos to a predefined area and manipulate those images and text inside of that area. This is something that is used for Promotional Products or Tshirt design prints.
Please note that this feature is under active development and we are working on making it better.
- To enable Printable Areas please click on the button that looks like a printer on the main product screen.


- In the menu that appeared – click ‘Add New Printable Area’
- Give it a title and enable ‘Text’ for offering text editor to your customers or ‘Upload’ to let them upload logos or artwork. Select which view this area is for.

- Click ‘Save’.
- Configure the green square on the product, that’s where the Printable Area will show up
- Click Save again and close the Printable Area sidebar. (arrow button)

- In order to make it work you would need to make one more step. Click – Add New Panel on the main screen. Give it a title. It can be sizes, qty or any other customization for the product. Without this step the tab for Printable doesn’t show up for now :/ You can hide the panel you don’t need via custom CSS.

Enjoy Printable Areas on your product![/vc_column_text][/vc_tta_section][vc_tta_section title=”Conditional Logic” tab_id=”1511185246523-e25b0cc2-f860″][vc_column_text]
Also, you can create rules to specify behavior (when panels and categories are visible or hidden)
 [/vc_column_text][/vc_tta_section][vc_tta_section title=”Sharable links” tab_id=”1511186670787-b66d99f2-2964″][vc_column_text]
When someone sharing product by clicking «Share» button on frontend product page, the hash parameter «configid» is adding to current URL. For example, #configid=TEnEZ3ECIq9WHhixVOnKV6UJ
JSON configuration data is sending in request and saving in database in «cpb_product_config» table. We save «configid», «technicalData» (panel, category and option ids) and path to image.
And when someone opens shared link this stored data is loading on page.[/vc_column_text][/vc_tta_section][vc_tta_section title=”Custom Layers” tab_id=”1541602621100-c679c9be-0ee4″][vc_column_text]
Custom Layers
Custom layers are one of the main parts of the system. With their help, you can create engraving on objects, upload a custom image to any part of the product, paint parts of the product without loading additional images. And much more …
Types of Custom Layers
- Path – This type is used to create click areas and load custom photos on a product, bounded by the layer area.
- Text – This type is used to add text to the product. For example, an inscription on a T-shirt or other object or engraving.
- Image – This type is used to add image whose color can be changed later. Or adding textures to objects whose colors can also be changed.
Create Custom Layers
Steps to create “Path” Custom Layer
Click button.![]() The form for creating a new layer has been opened.
The form for creating a new layer has been opened.
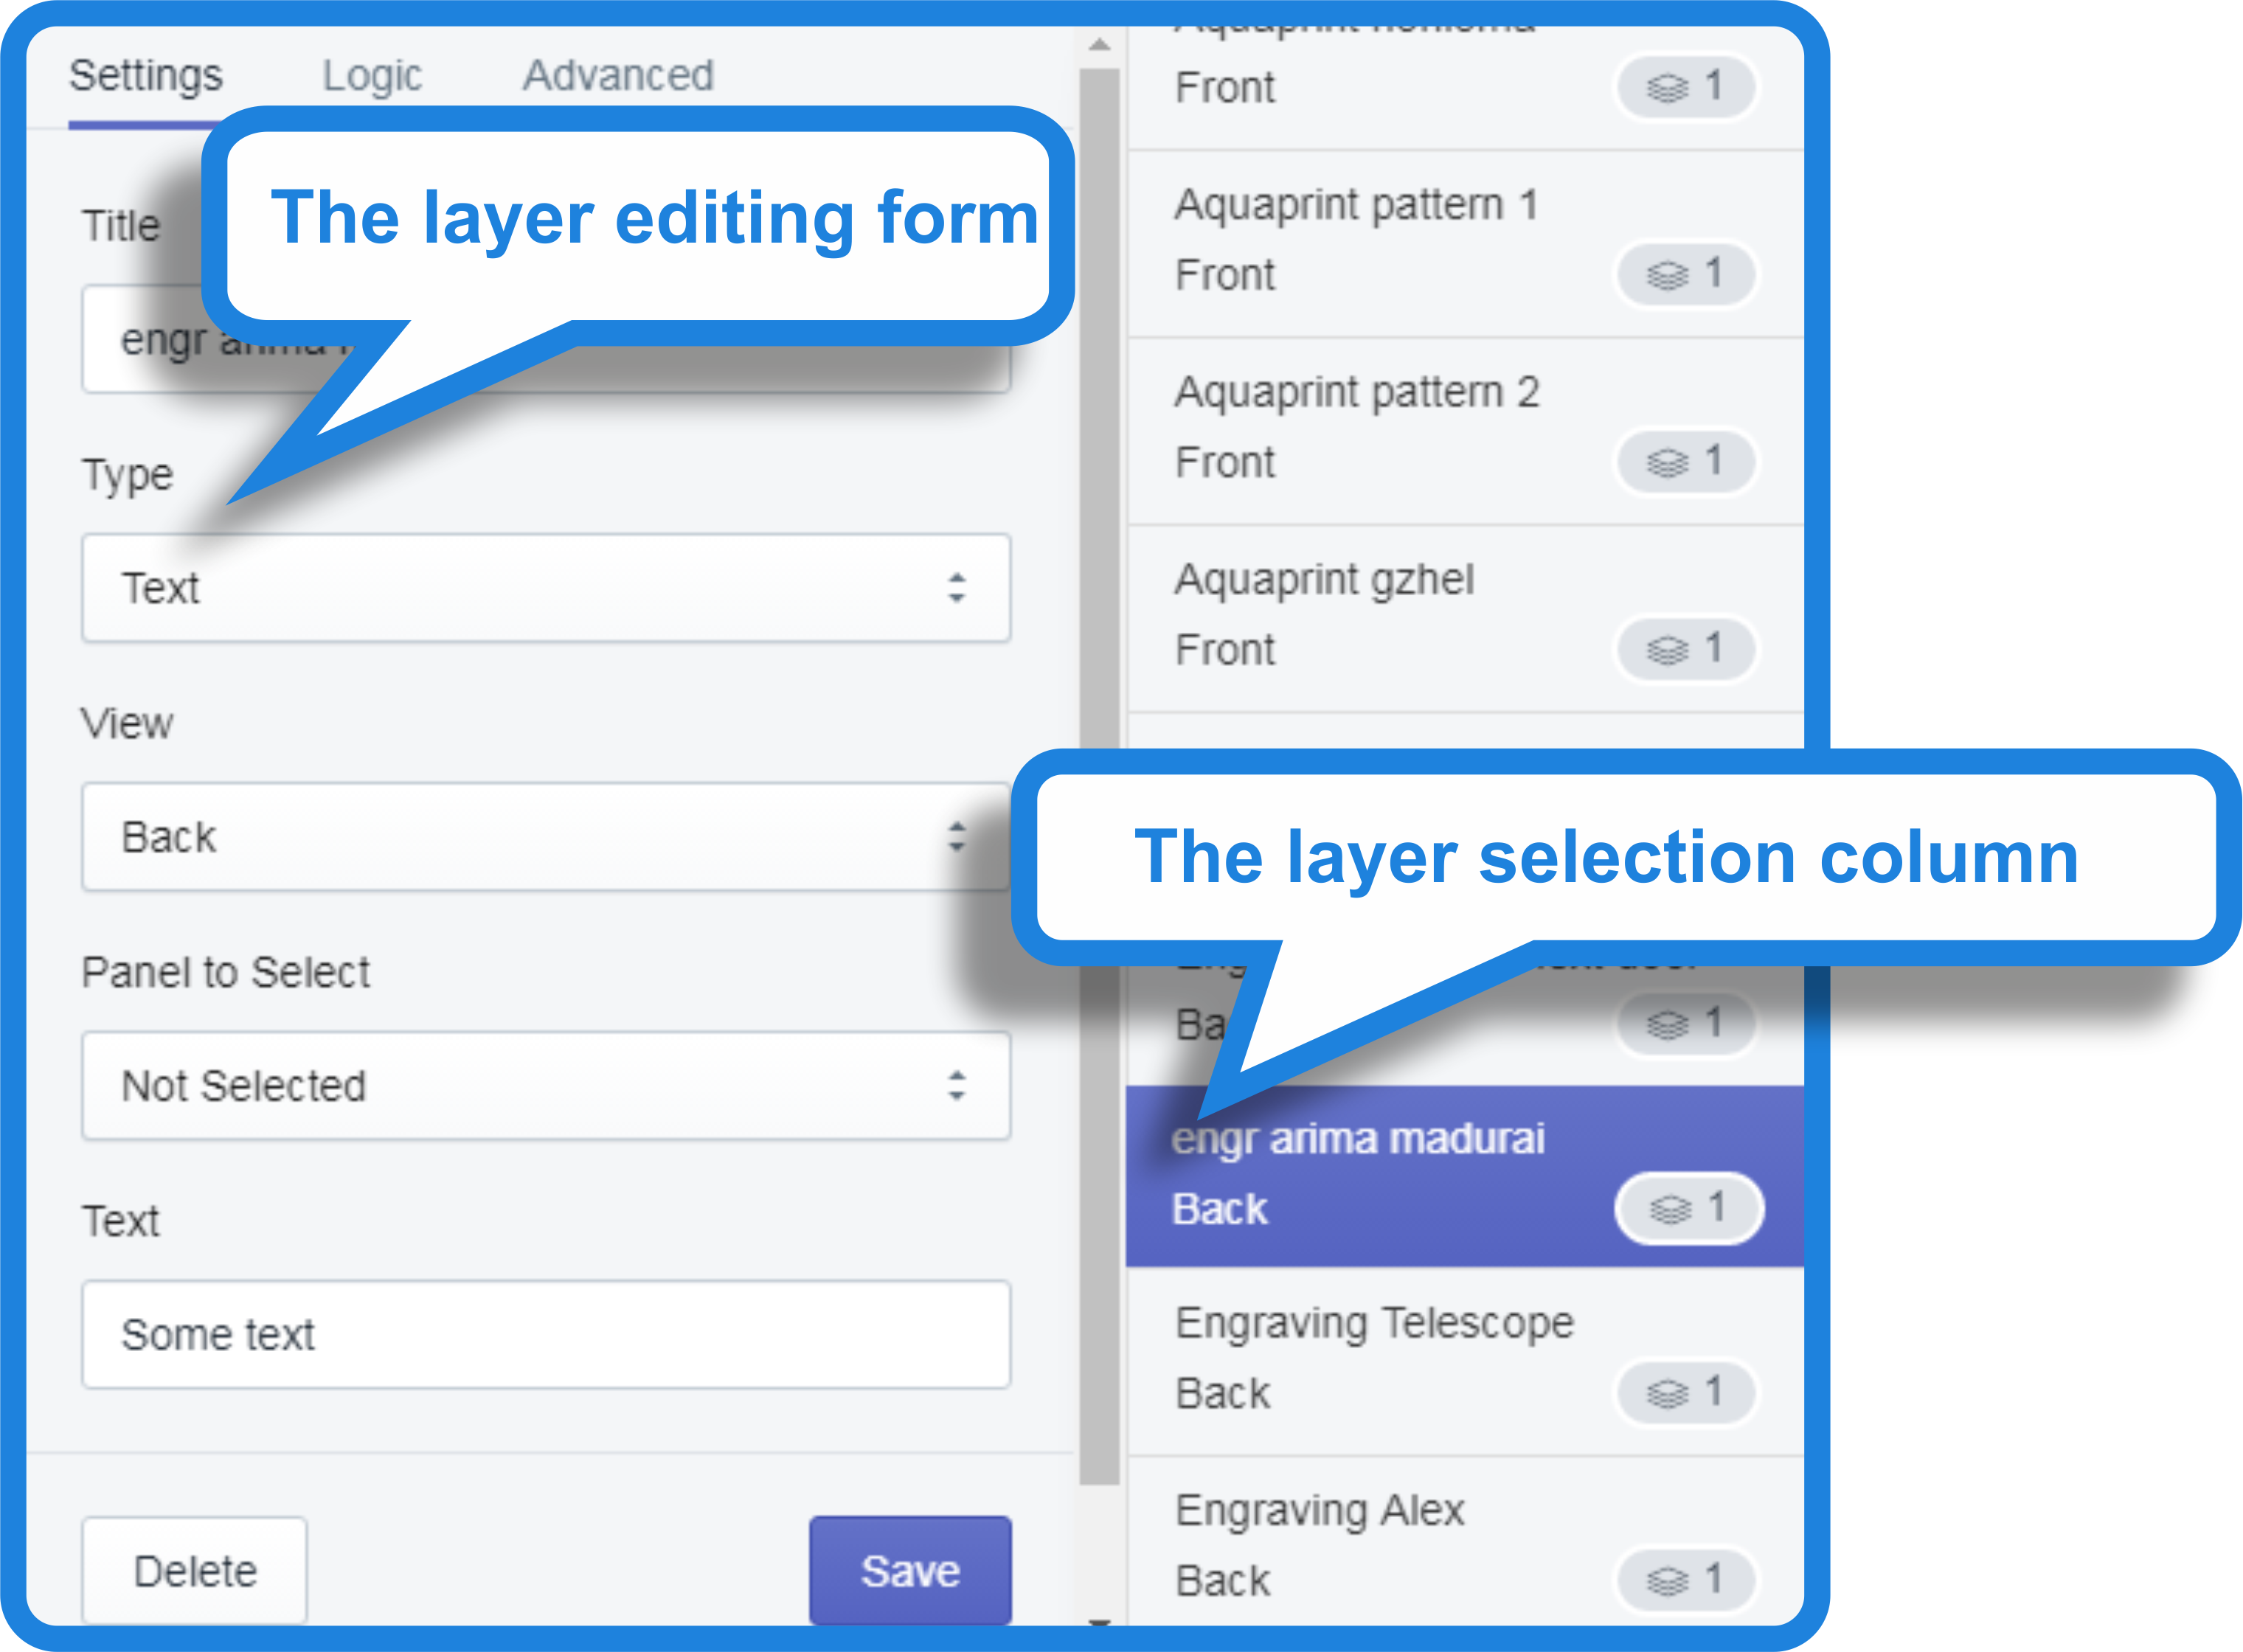
Click button “Add New Custom Layer”.![]() The new layer added. Click it in the Layer Selection Column.
The new layer added. Click it in the Layer Selection Column.
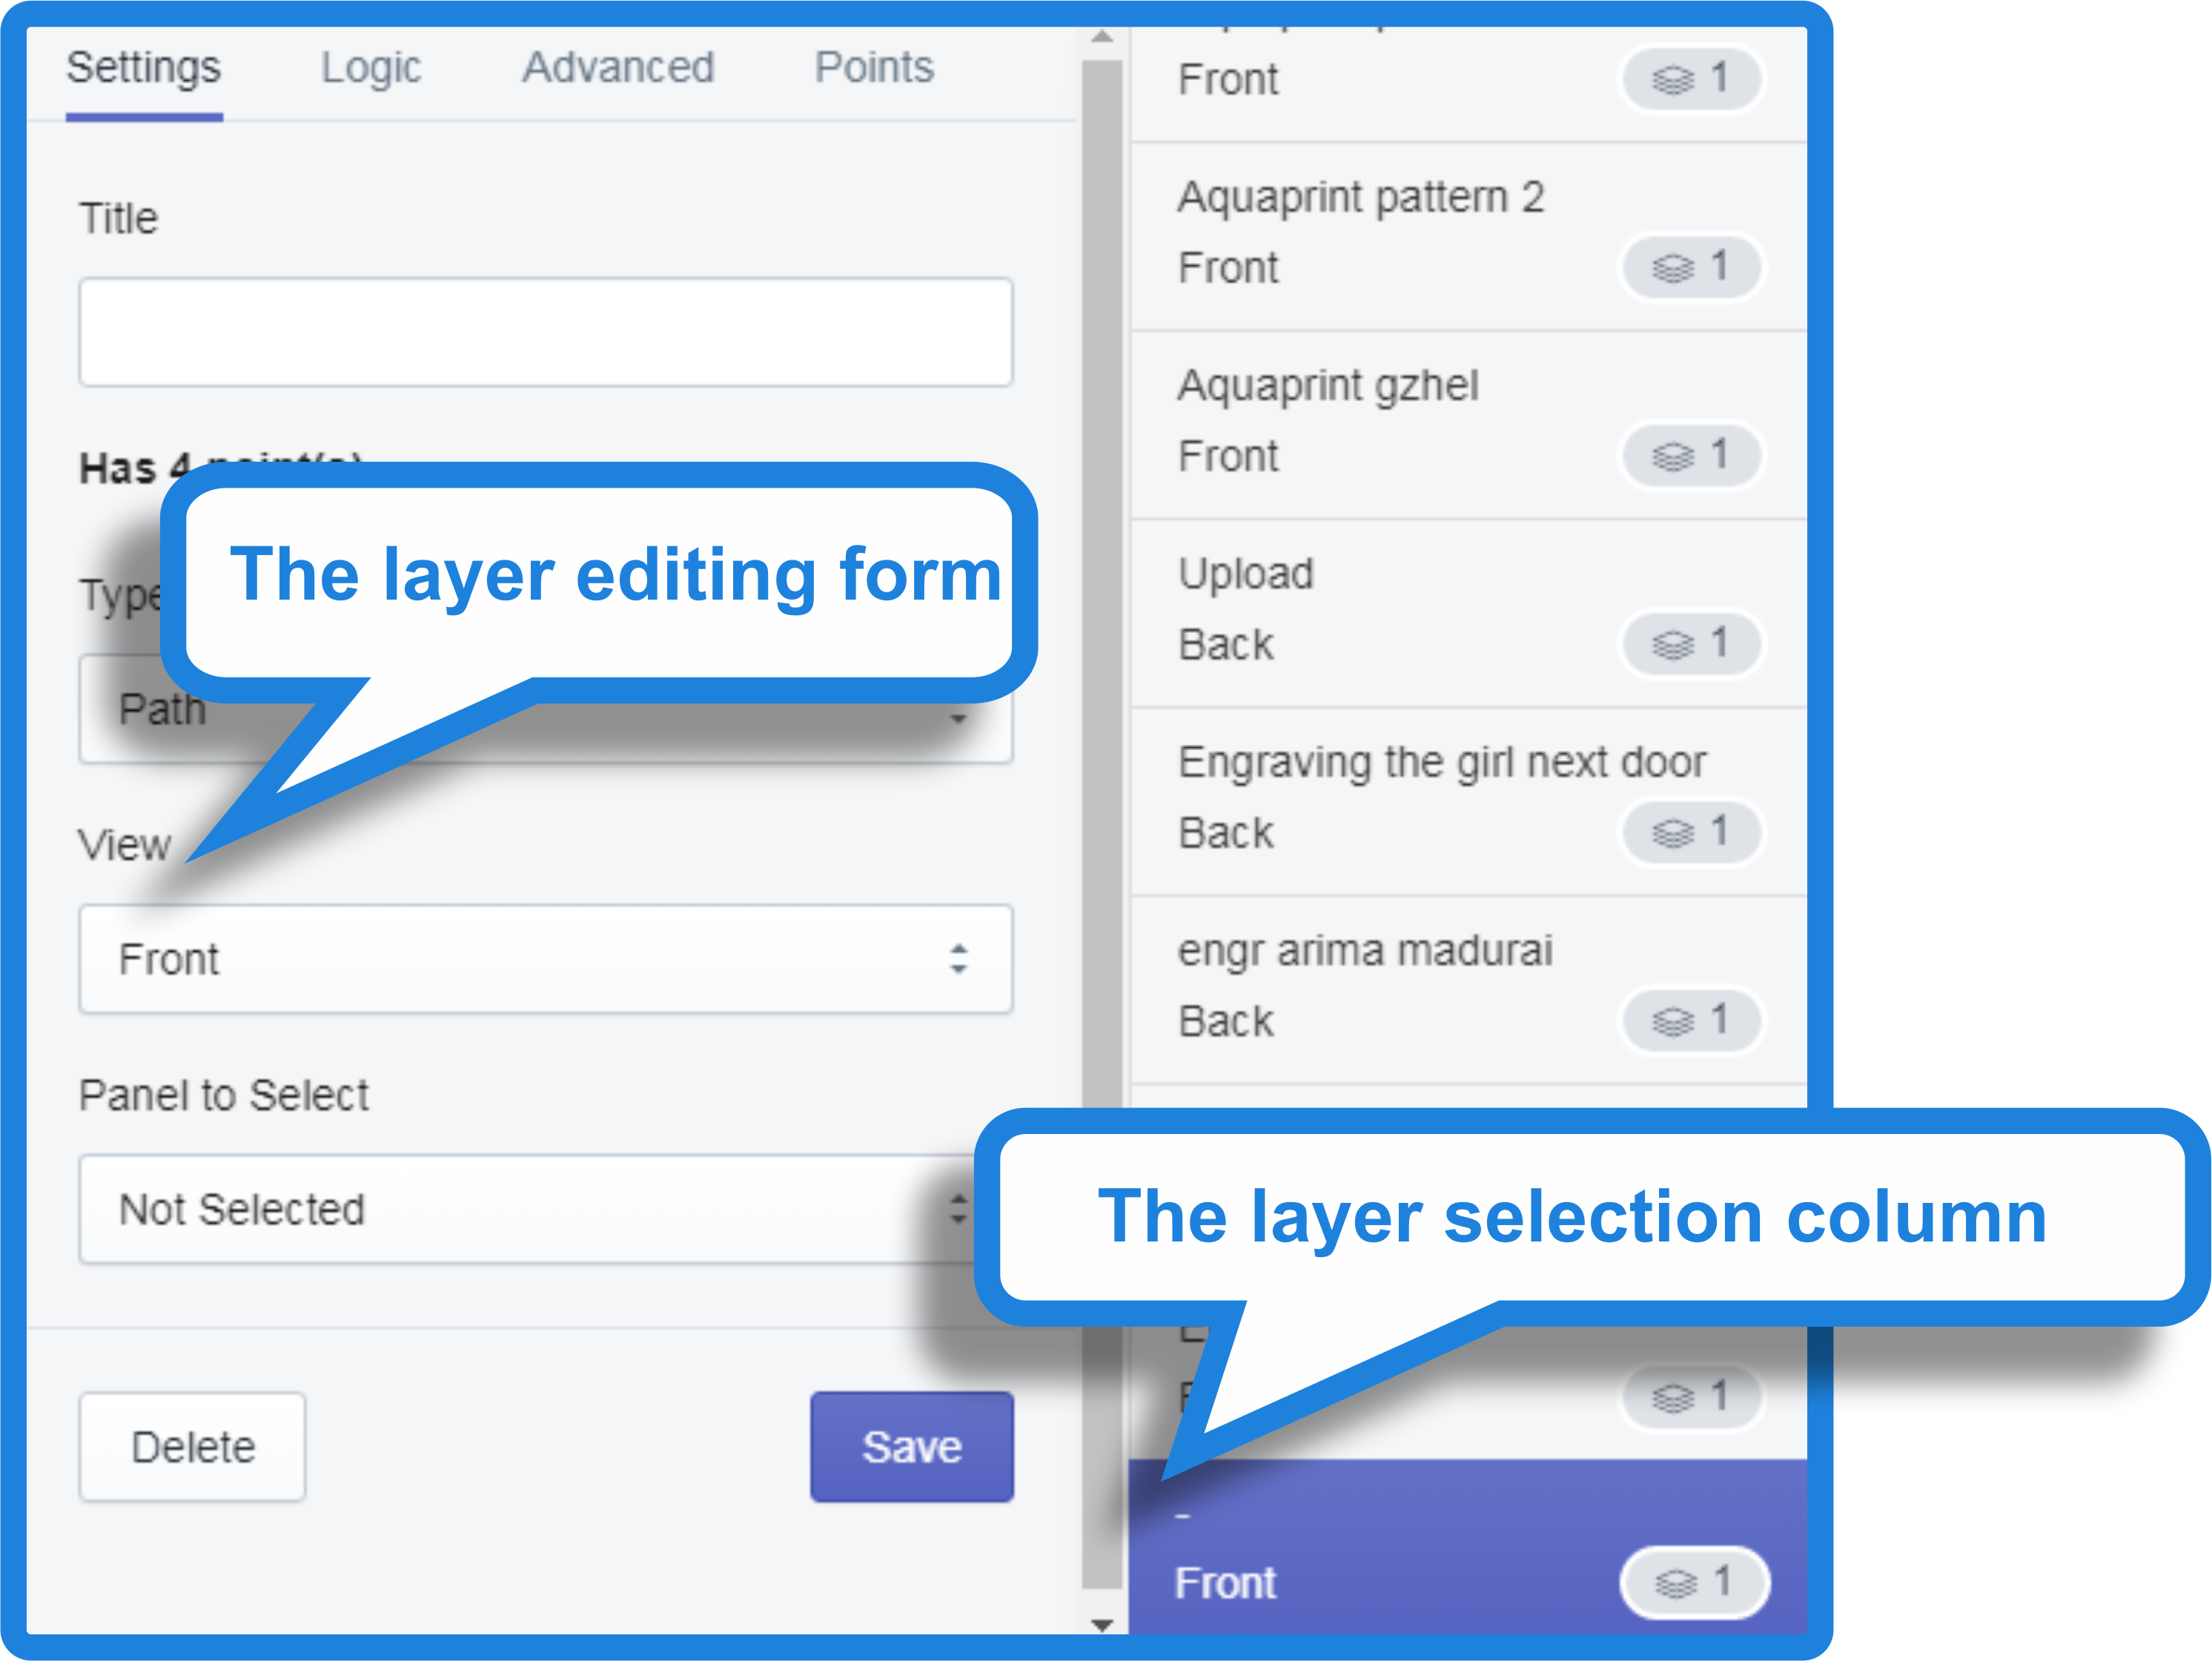
Fill in the following fields in the Settings tab
Title: some title
Type: Path
View: change view
Panel to select: The panel to which to go after clicking on the custom layer
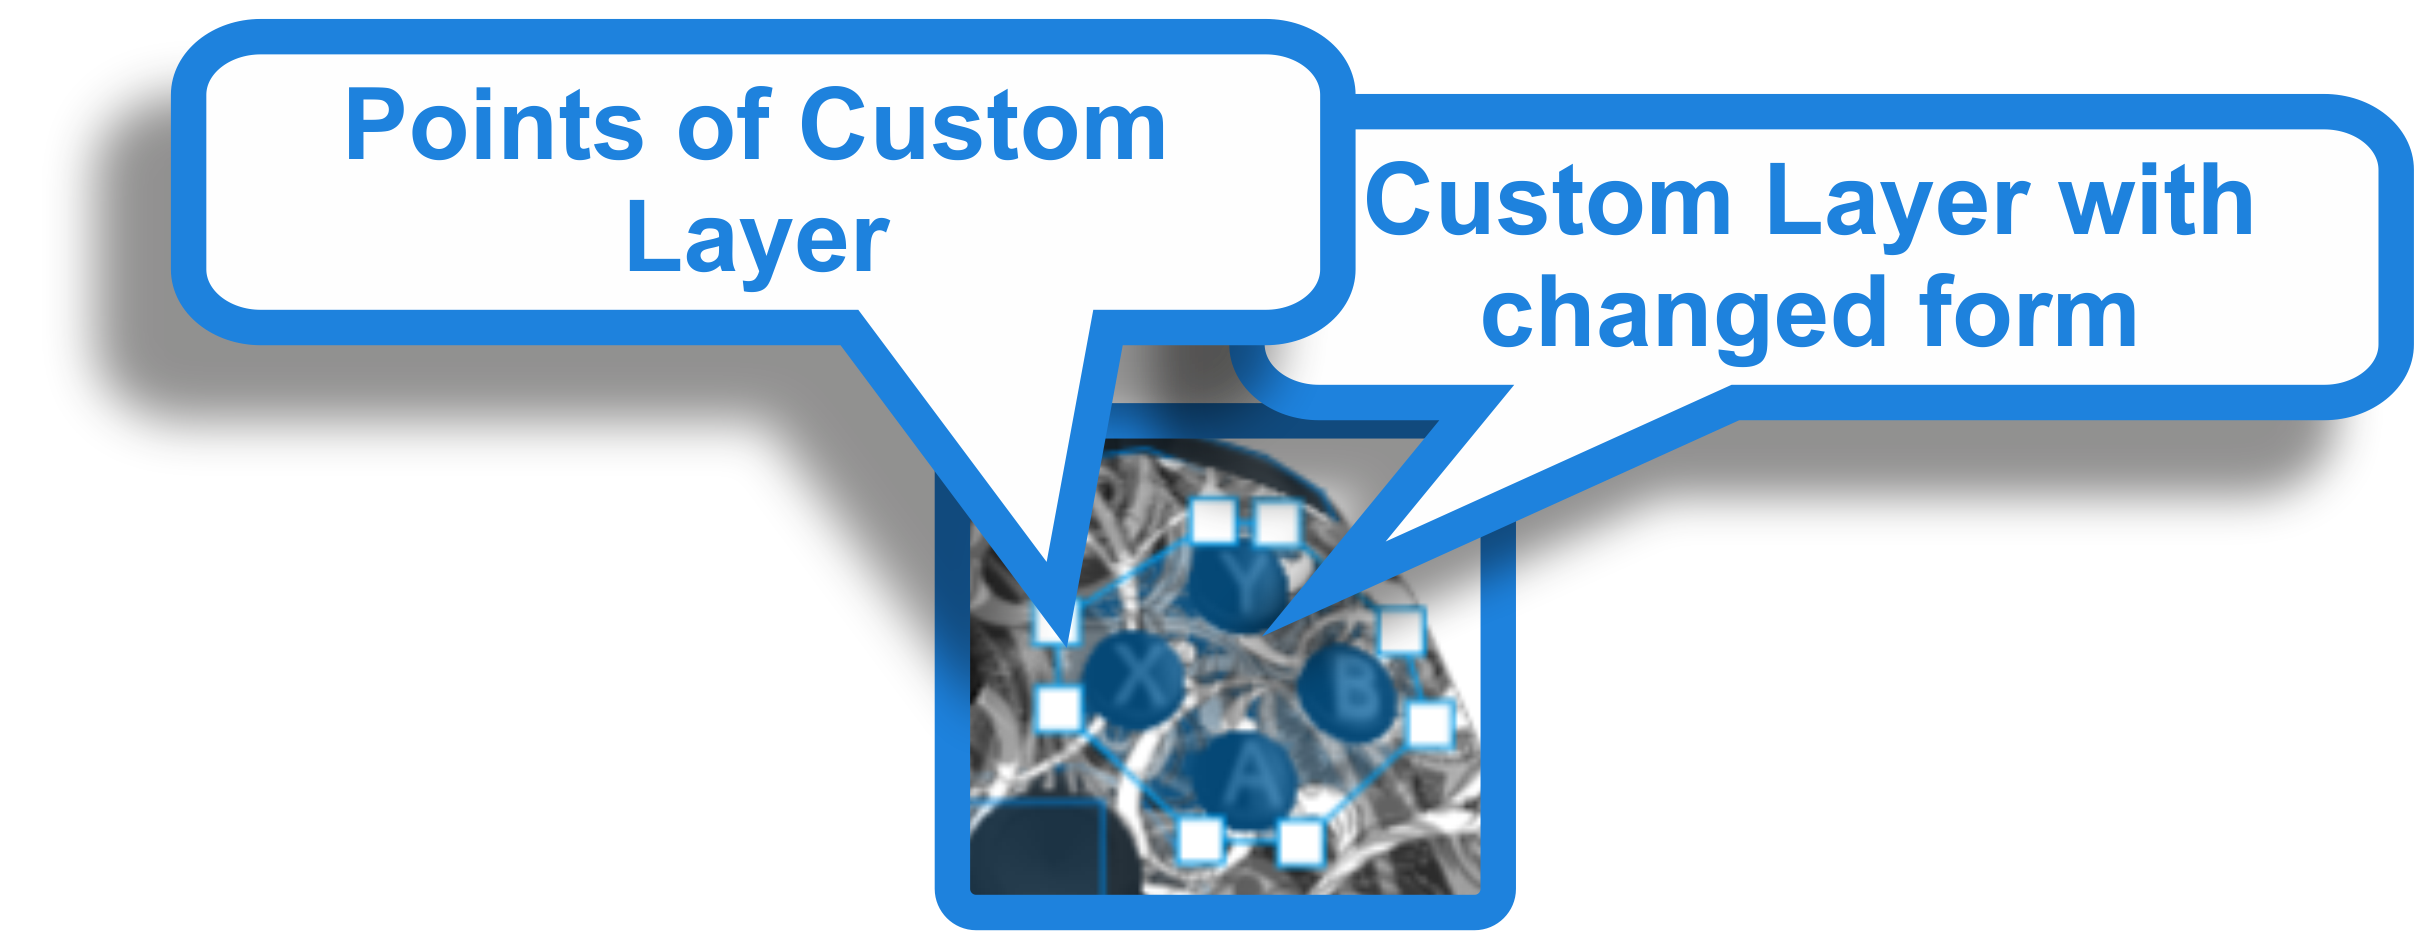
Next, if you want to change the shape, the size of the layer and the position on the page, you must drag the layer or individual points with the mouse cursor. To delete unnecessary points, you need to press the Shift and click on it with the mouse.
Fill in the following fields in the Advanced tab
Use Color Hover – If you want to use color hover, turn on the switch. This functionality is only for painting the layer when it has hovered over the mouse
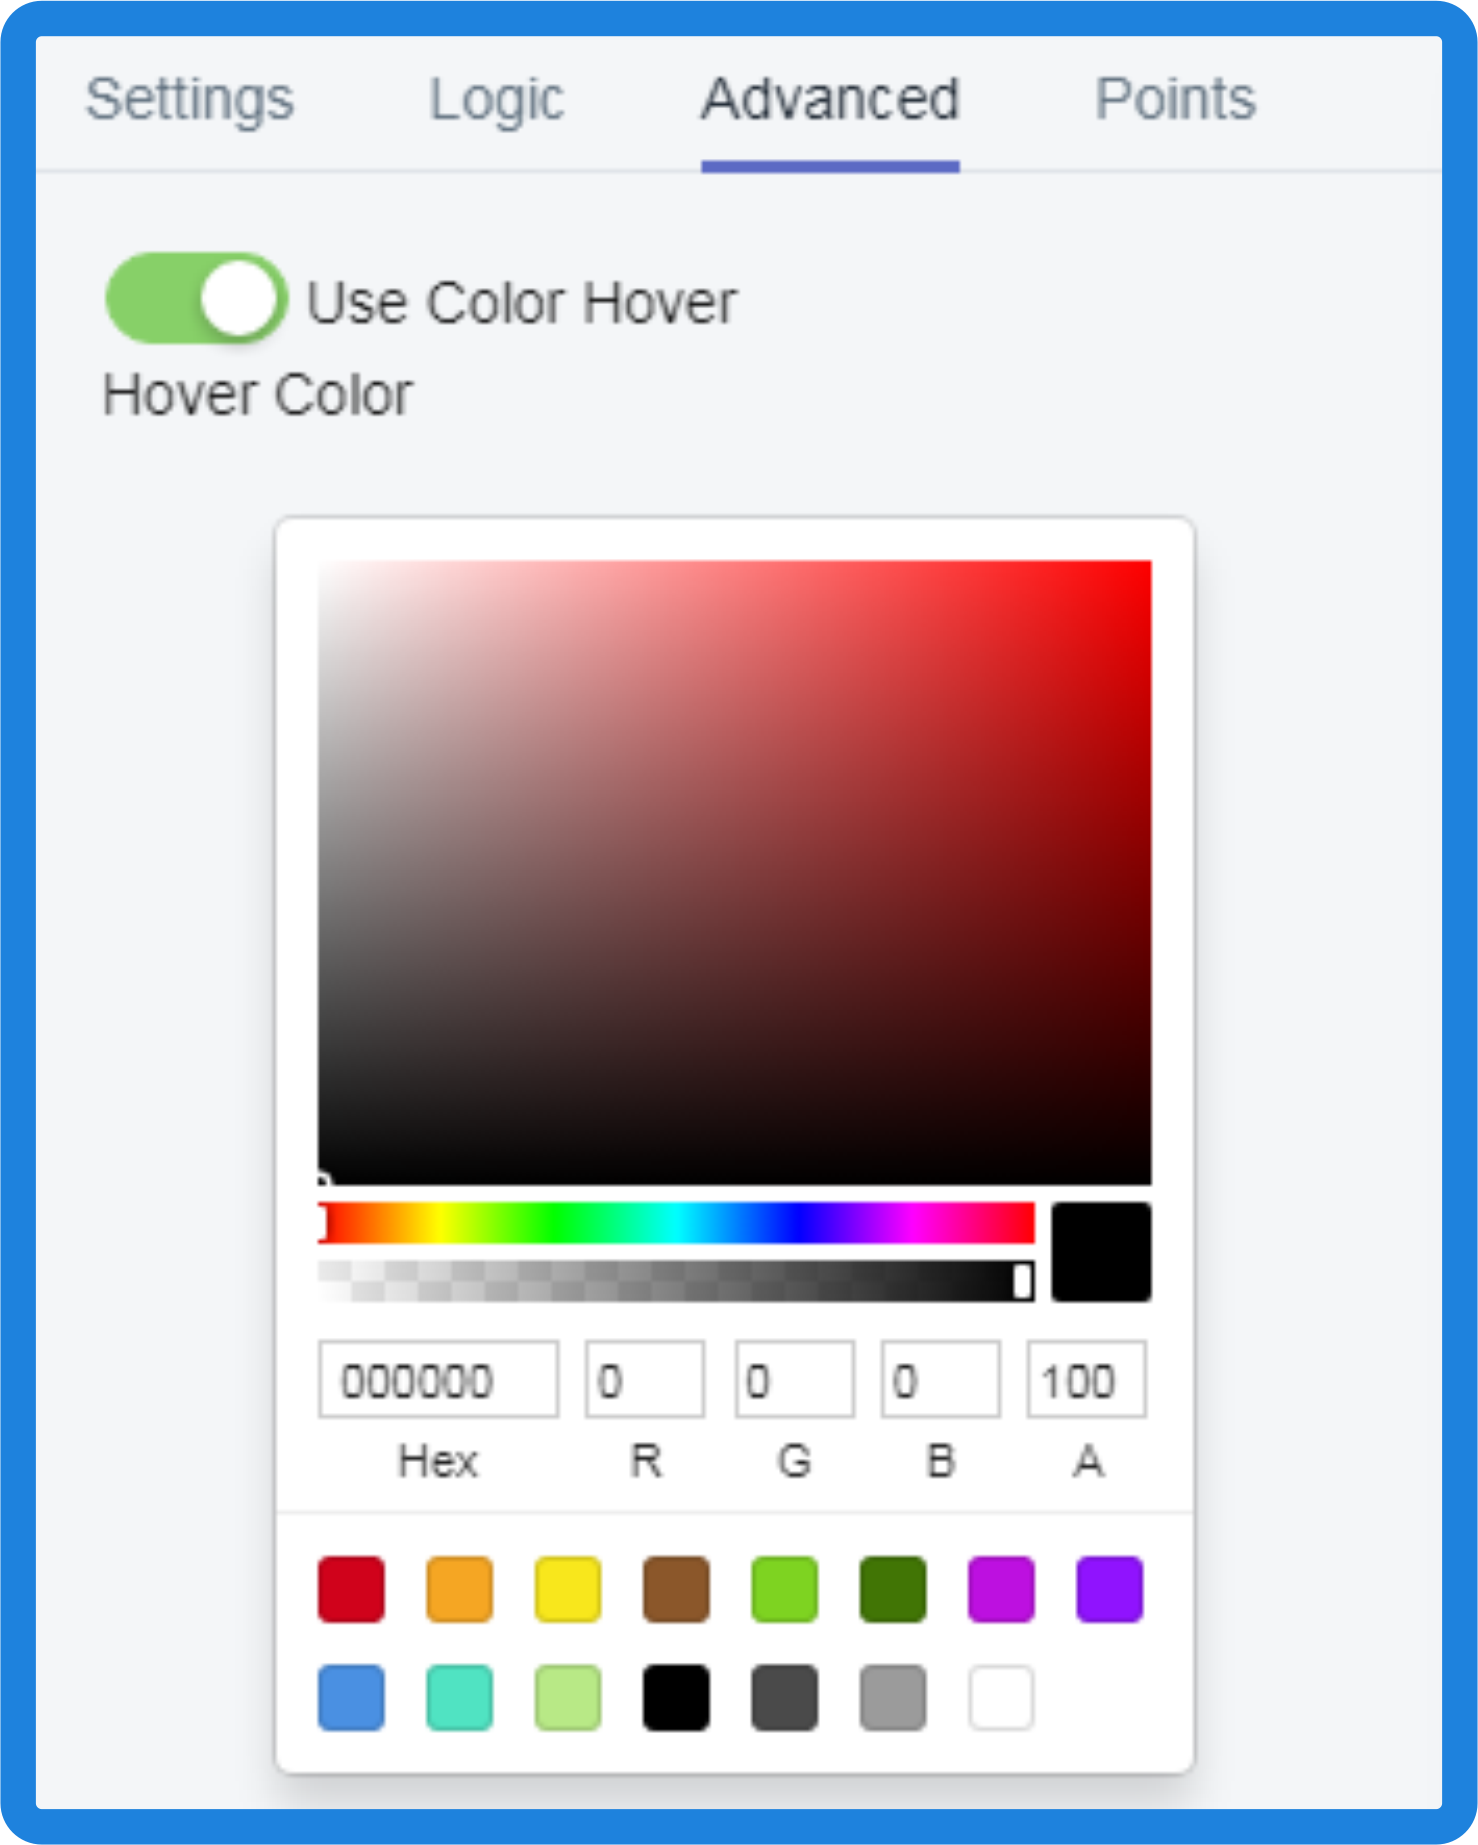
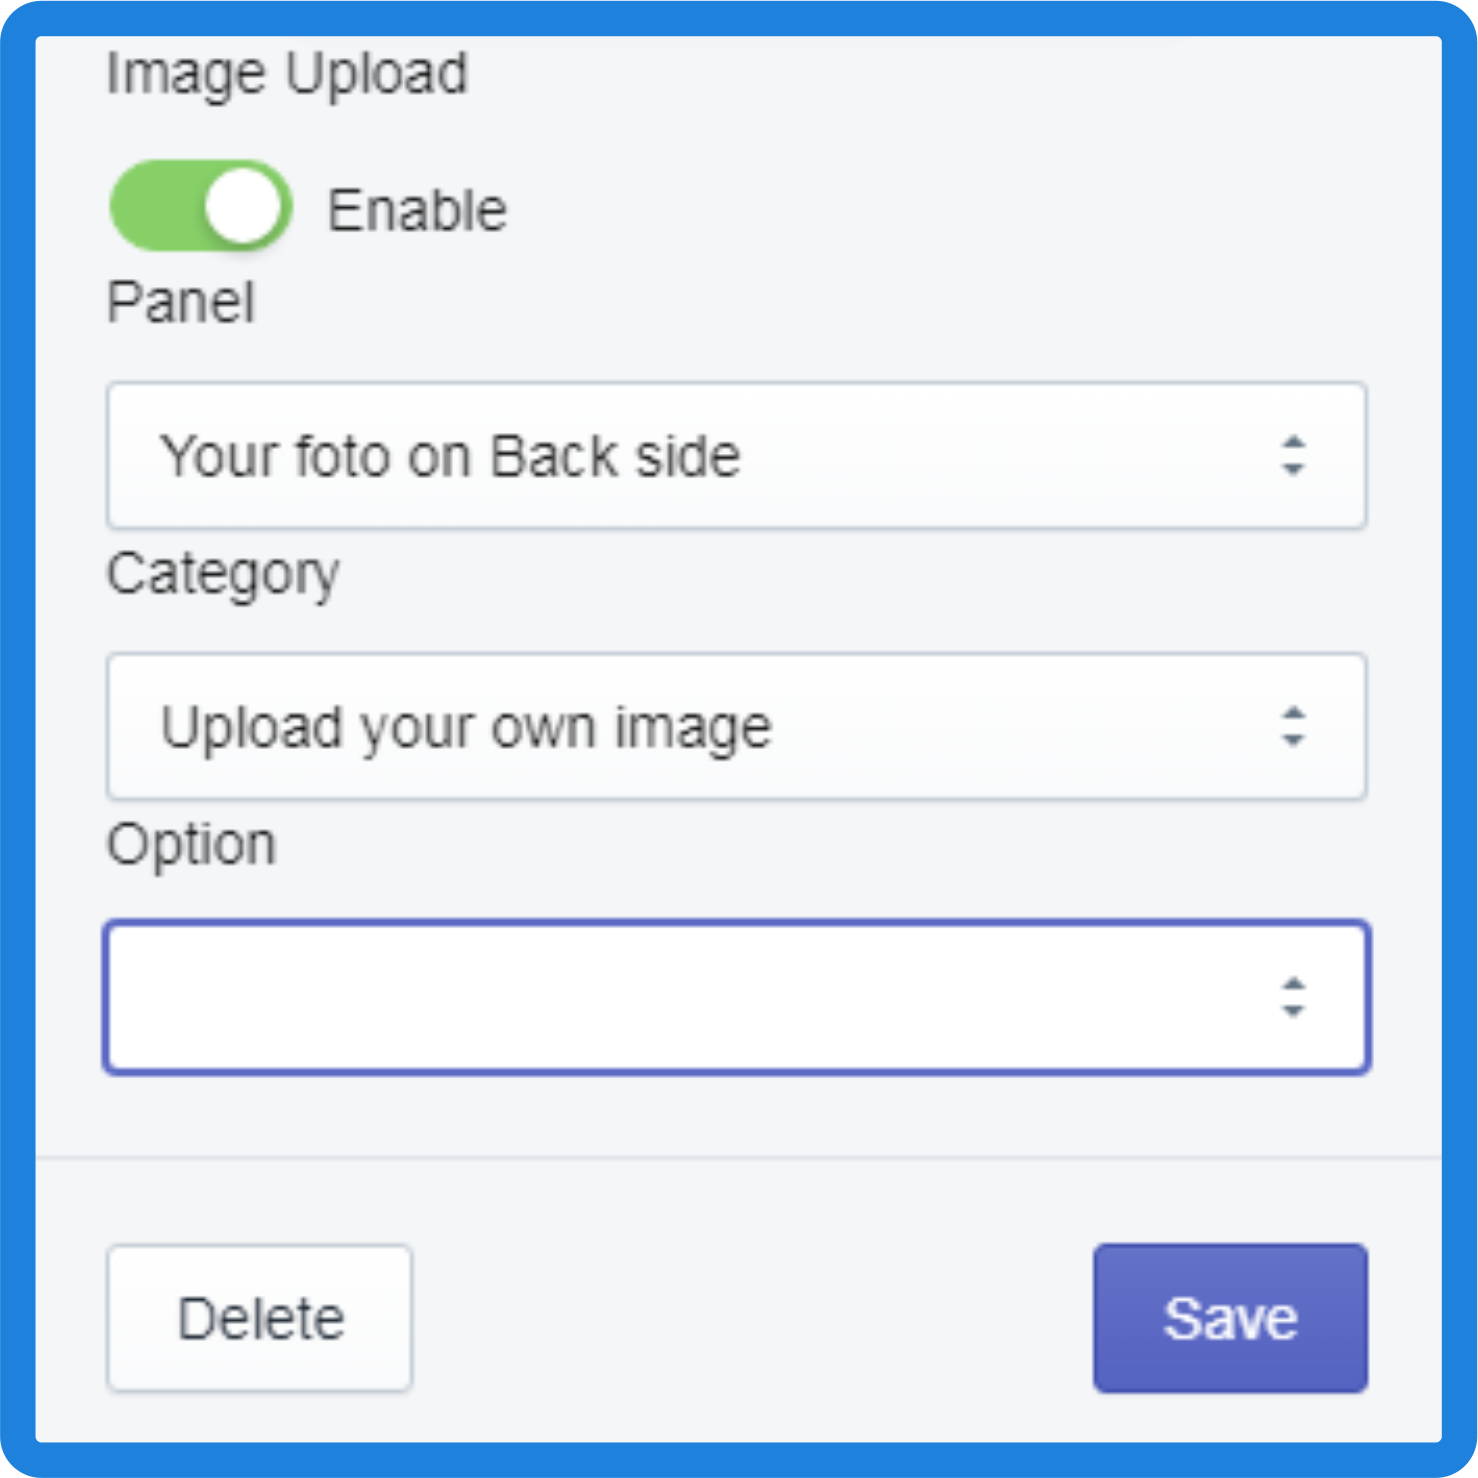
Image Upload – If you want to upload some image, for example, print on a T-shirt, you need turn on the switch.
Fill in the following fields
Panel: the panel in which the necessary category is located
Category: the category in which the required option is located
Option: option with “File Upload” type only.
Click Save and collapse settings by pressing the button ![]()
Steps to create “Text” Custom Layer
Click button.![]() The form for creating a new layer has been opened.
The form for creating a new layer has been opened.
Click button “Add New Custom Layer”.![]() The new layer added. Click it in the Layer Selection Column.
The new layer added. Click it in the Layer Selection Column.
Fill in the following fields in the Settings tab
Title: some title
Type: Text
View: change view
Panel to select: there is no need to fill
Text: add some text
Fill in the following fields in the Advanced tab
Font Size
Font Family
Font Color

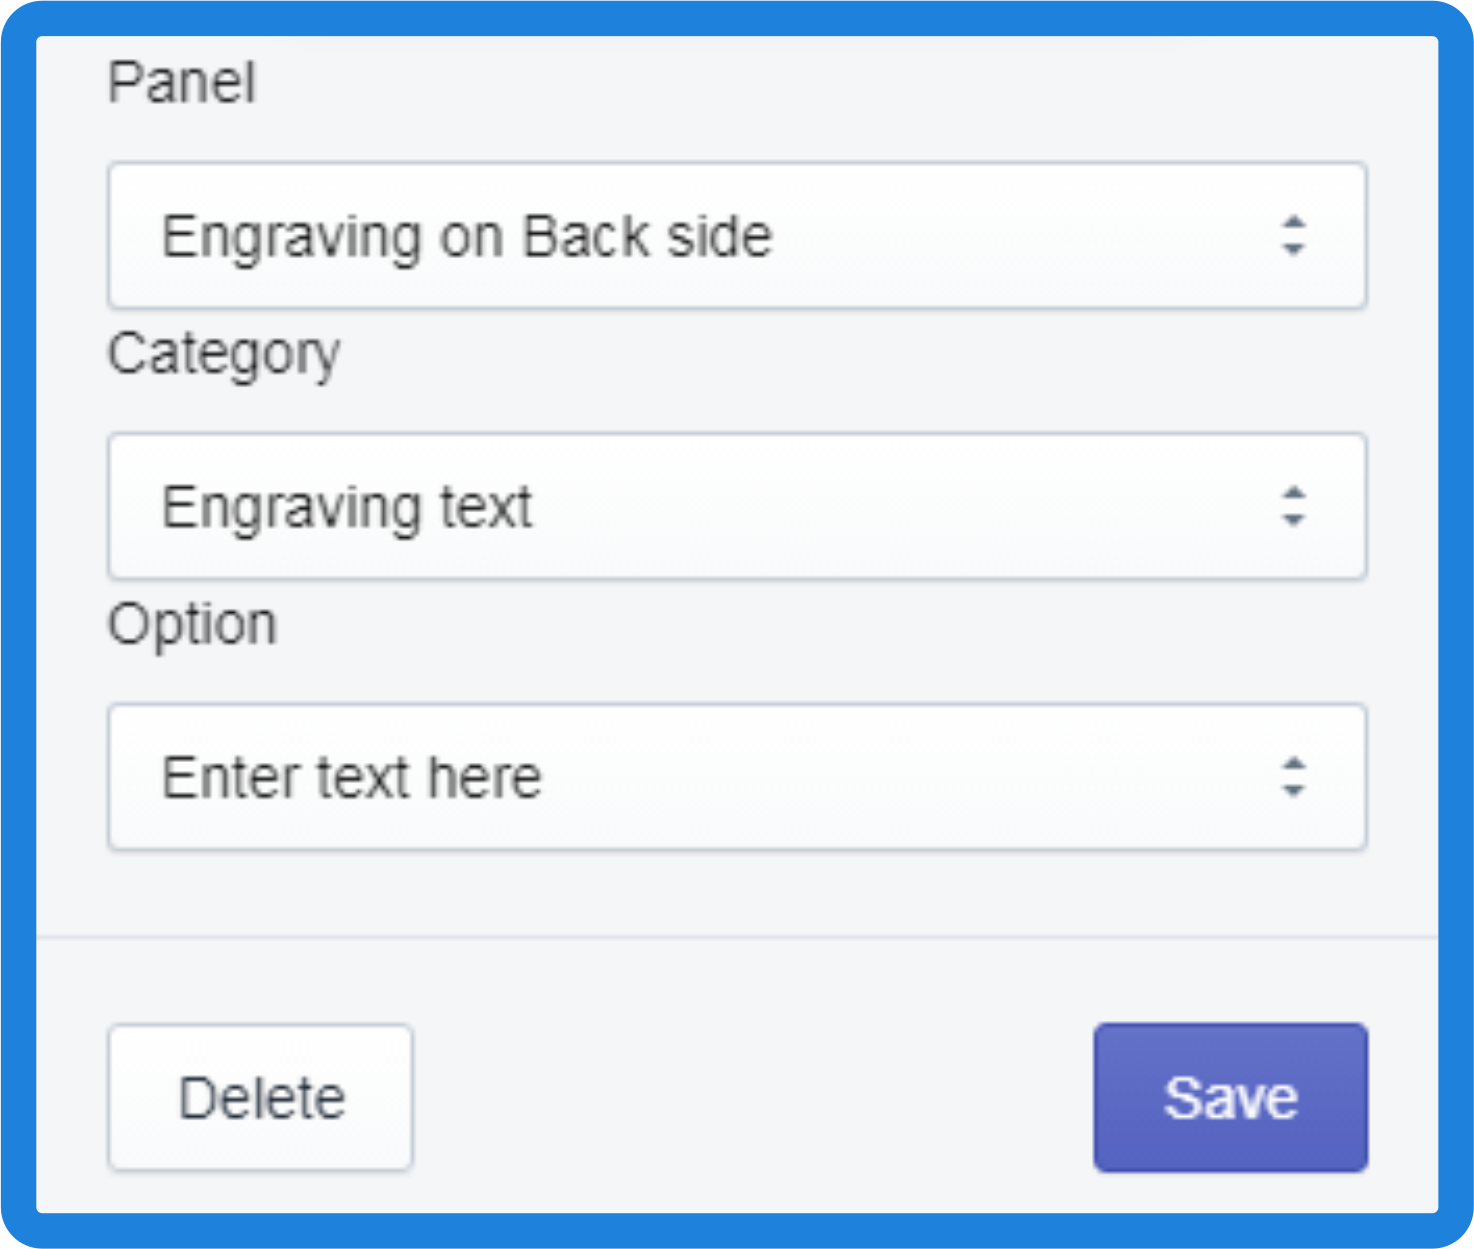
Panel: the panel in which the necessary category is located
Category: the category in which the required option is located
Option: option with “Text Field” type only.
Click Save and collapse settings by pressing the button ![]()
If you want to add several fonts you must to create one Custom Layer for each font.
Steps to create “Image” Custom Layer
Click button.![]() The form for creating a new layer has been opened.
The form for creating a new layer has been opened.
Click button “Add New Custom Layer”.![]() The new layer added. Click it in the Layer Selection Column.
The new layer added. Click it in the Layer Selection Column.
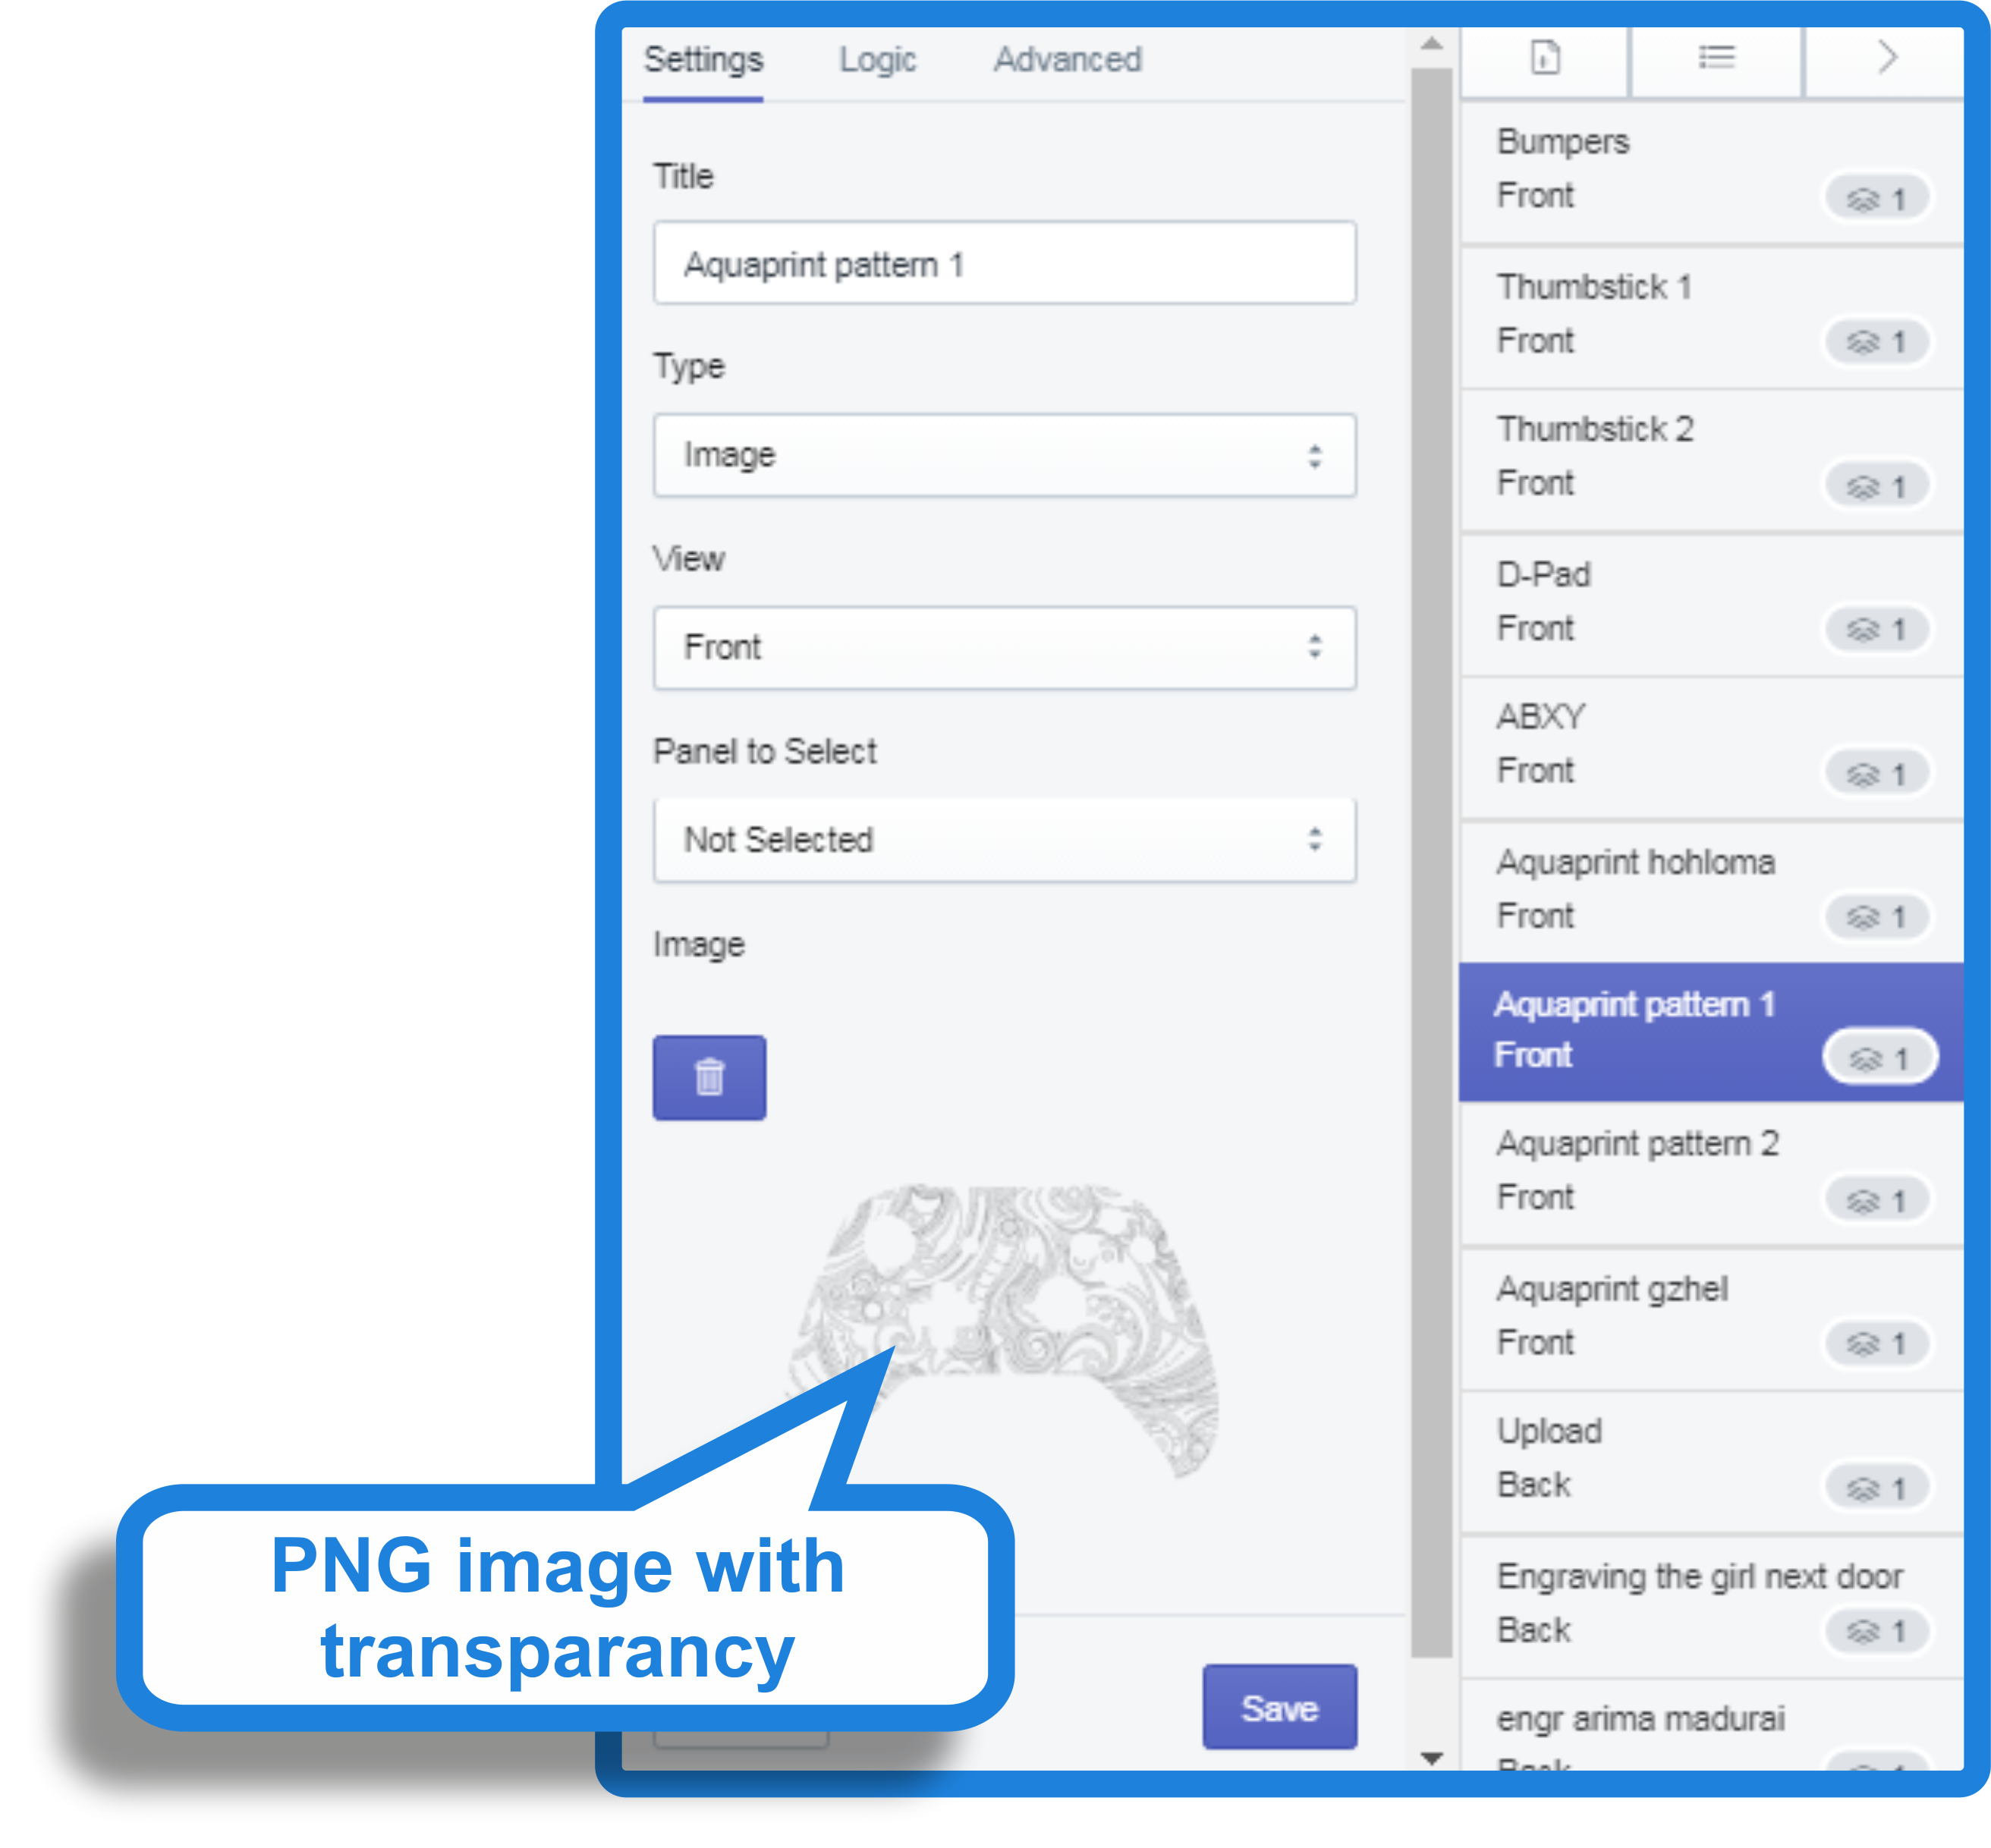
Fill in the following fields in the Settings tab
Title: some title
Type: Image
View: change view
Panel to select: there is no need to fill
Image: You need to upload PNG image with transparency and image positioning
Fill in the following fields in the Advanced tab
Colorize image layer – If you want to change colors of any texture, for example, aquaprinting pattern colors on any thing, you need turn on the switch.
Fill in the following fields
Panel: the panel in which the necessary category is located
Category: the category in which the required option is located with “Color thumbnail” type only
Alpha Transparency: alpha transparency level.
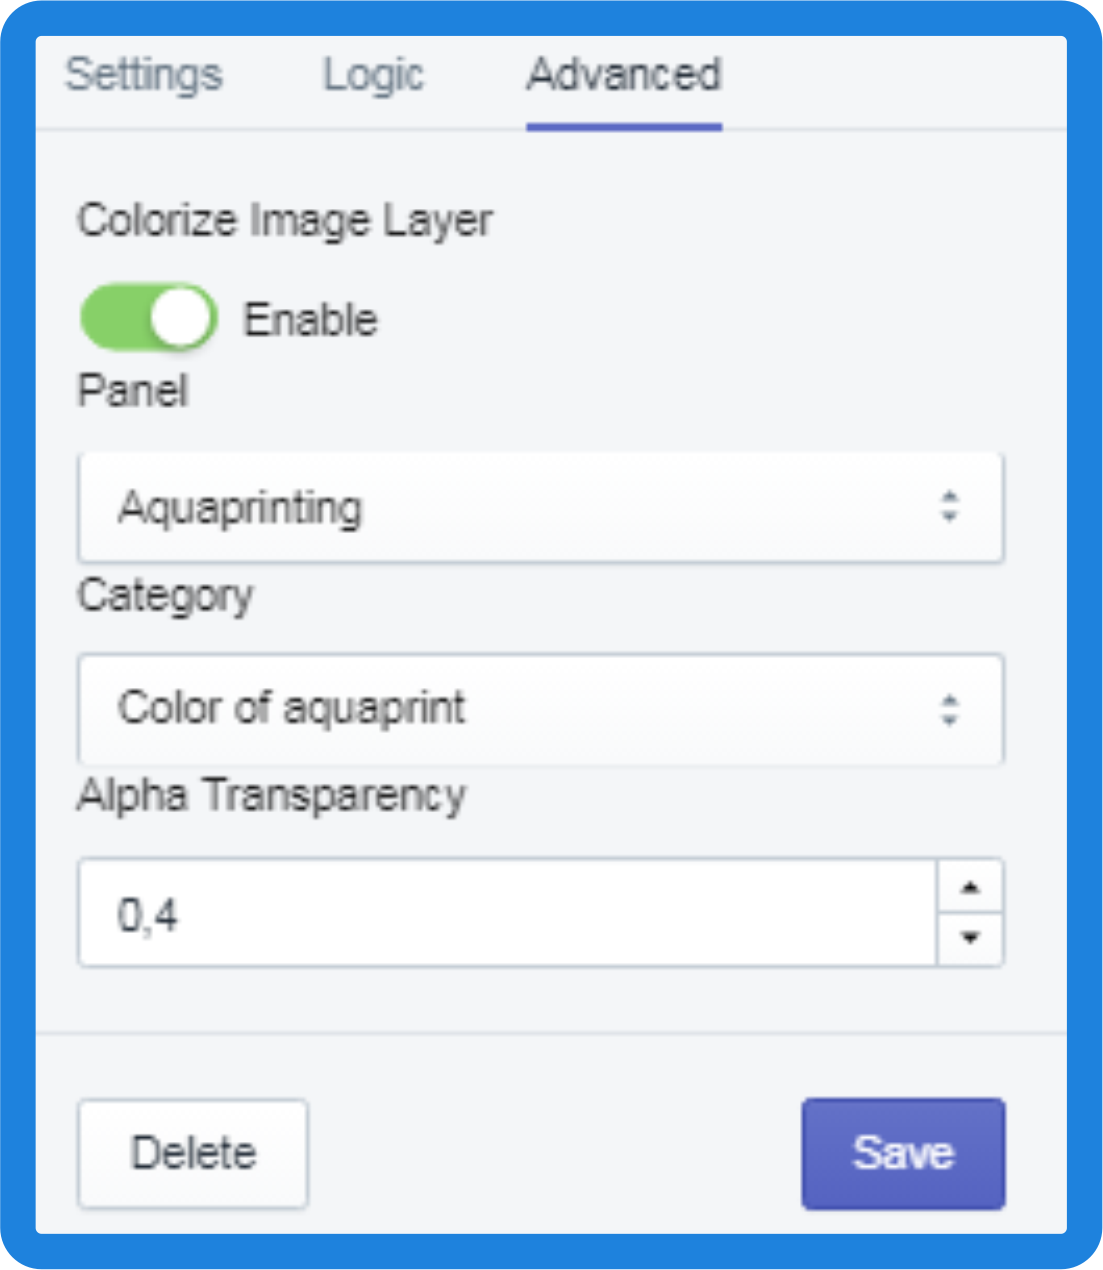
Image Upload – If you want to upload some image, for example, print on a T-shirt, you need turn on the switch.
Fill in the following fields
Panel: the panel in which the necessary category is located
Category: the category in which the required option is located
Option: option with “File Upload” type only.
Click Save and collapse settings by pressing the button ![]()
[/vc_column_text][/vc_tta_section][vc_tta_section title=”Logos & artwork” tab_id=”1541603470612-01a44b7c-bbf5″][vc_column_text]
Layer colorization and on the fly
- Create a new custom layer with “Image” type. How to do this, see the tab “Custom Layers”.
- Create a new Panel with the “Color thumbnail” category and add some color options.
- Enjoy the result
Now, the functionality is ready to use. Switch colors and your image will be painted in the right color without the need to upload new images.
Overlaying textures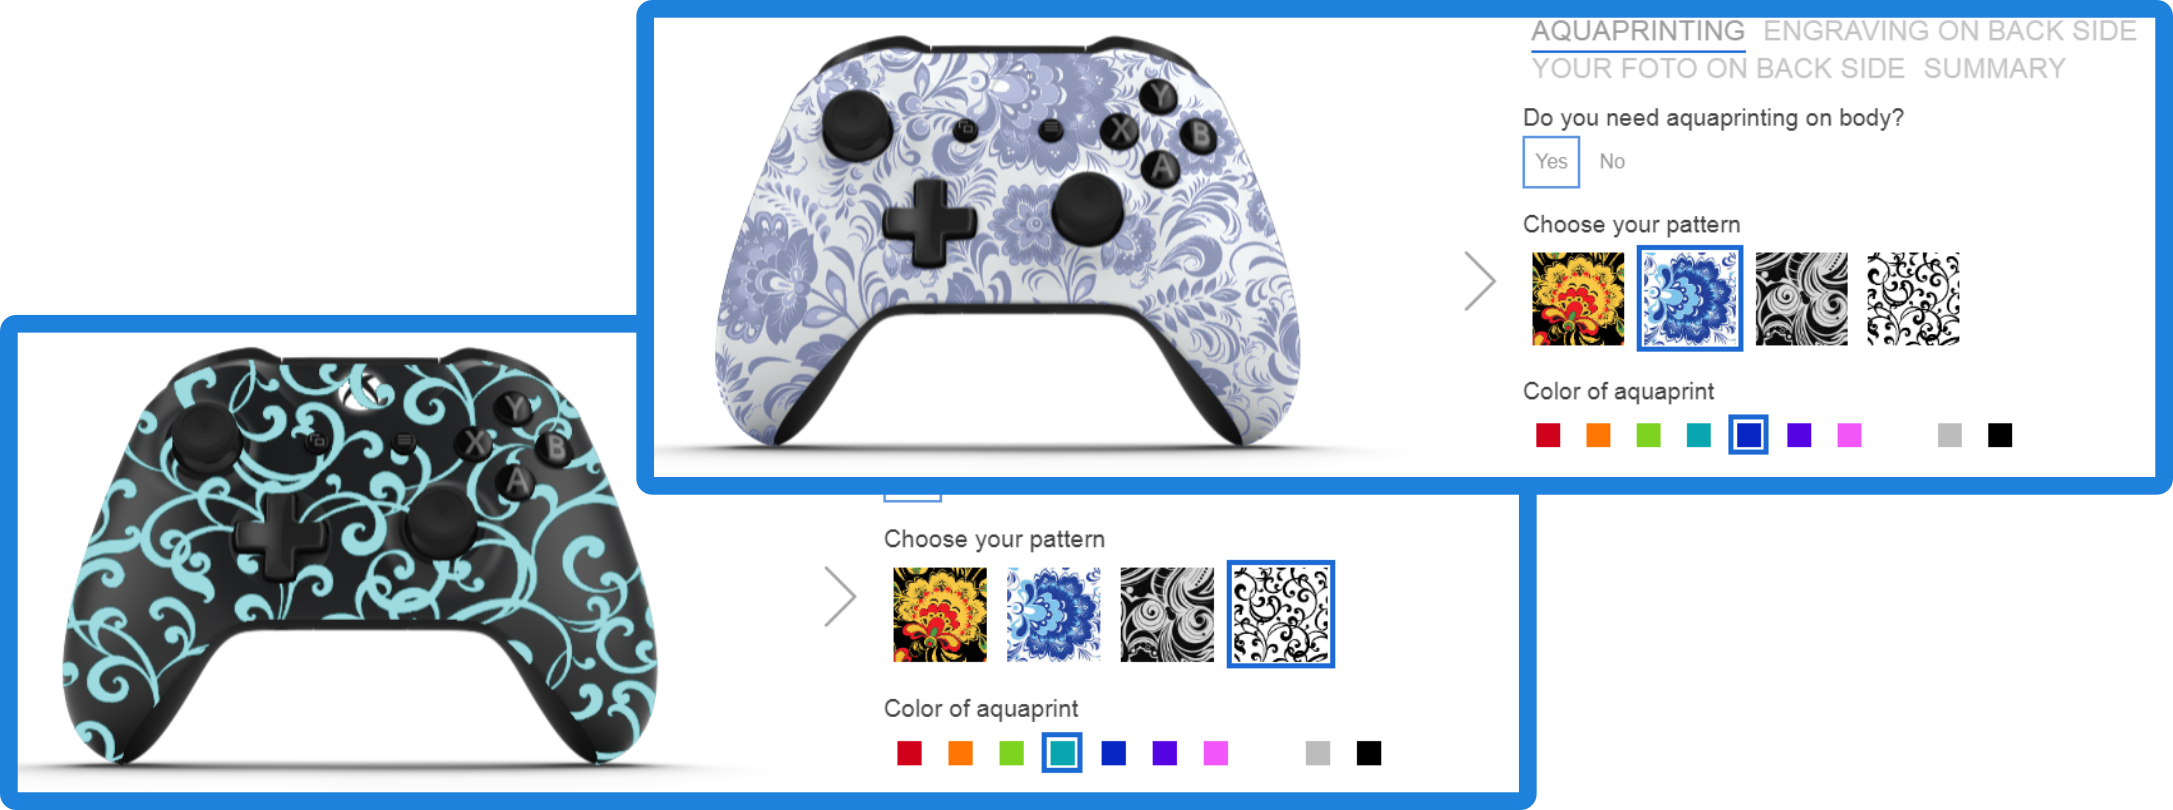
Changing the colors of individual elements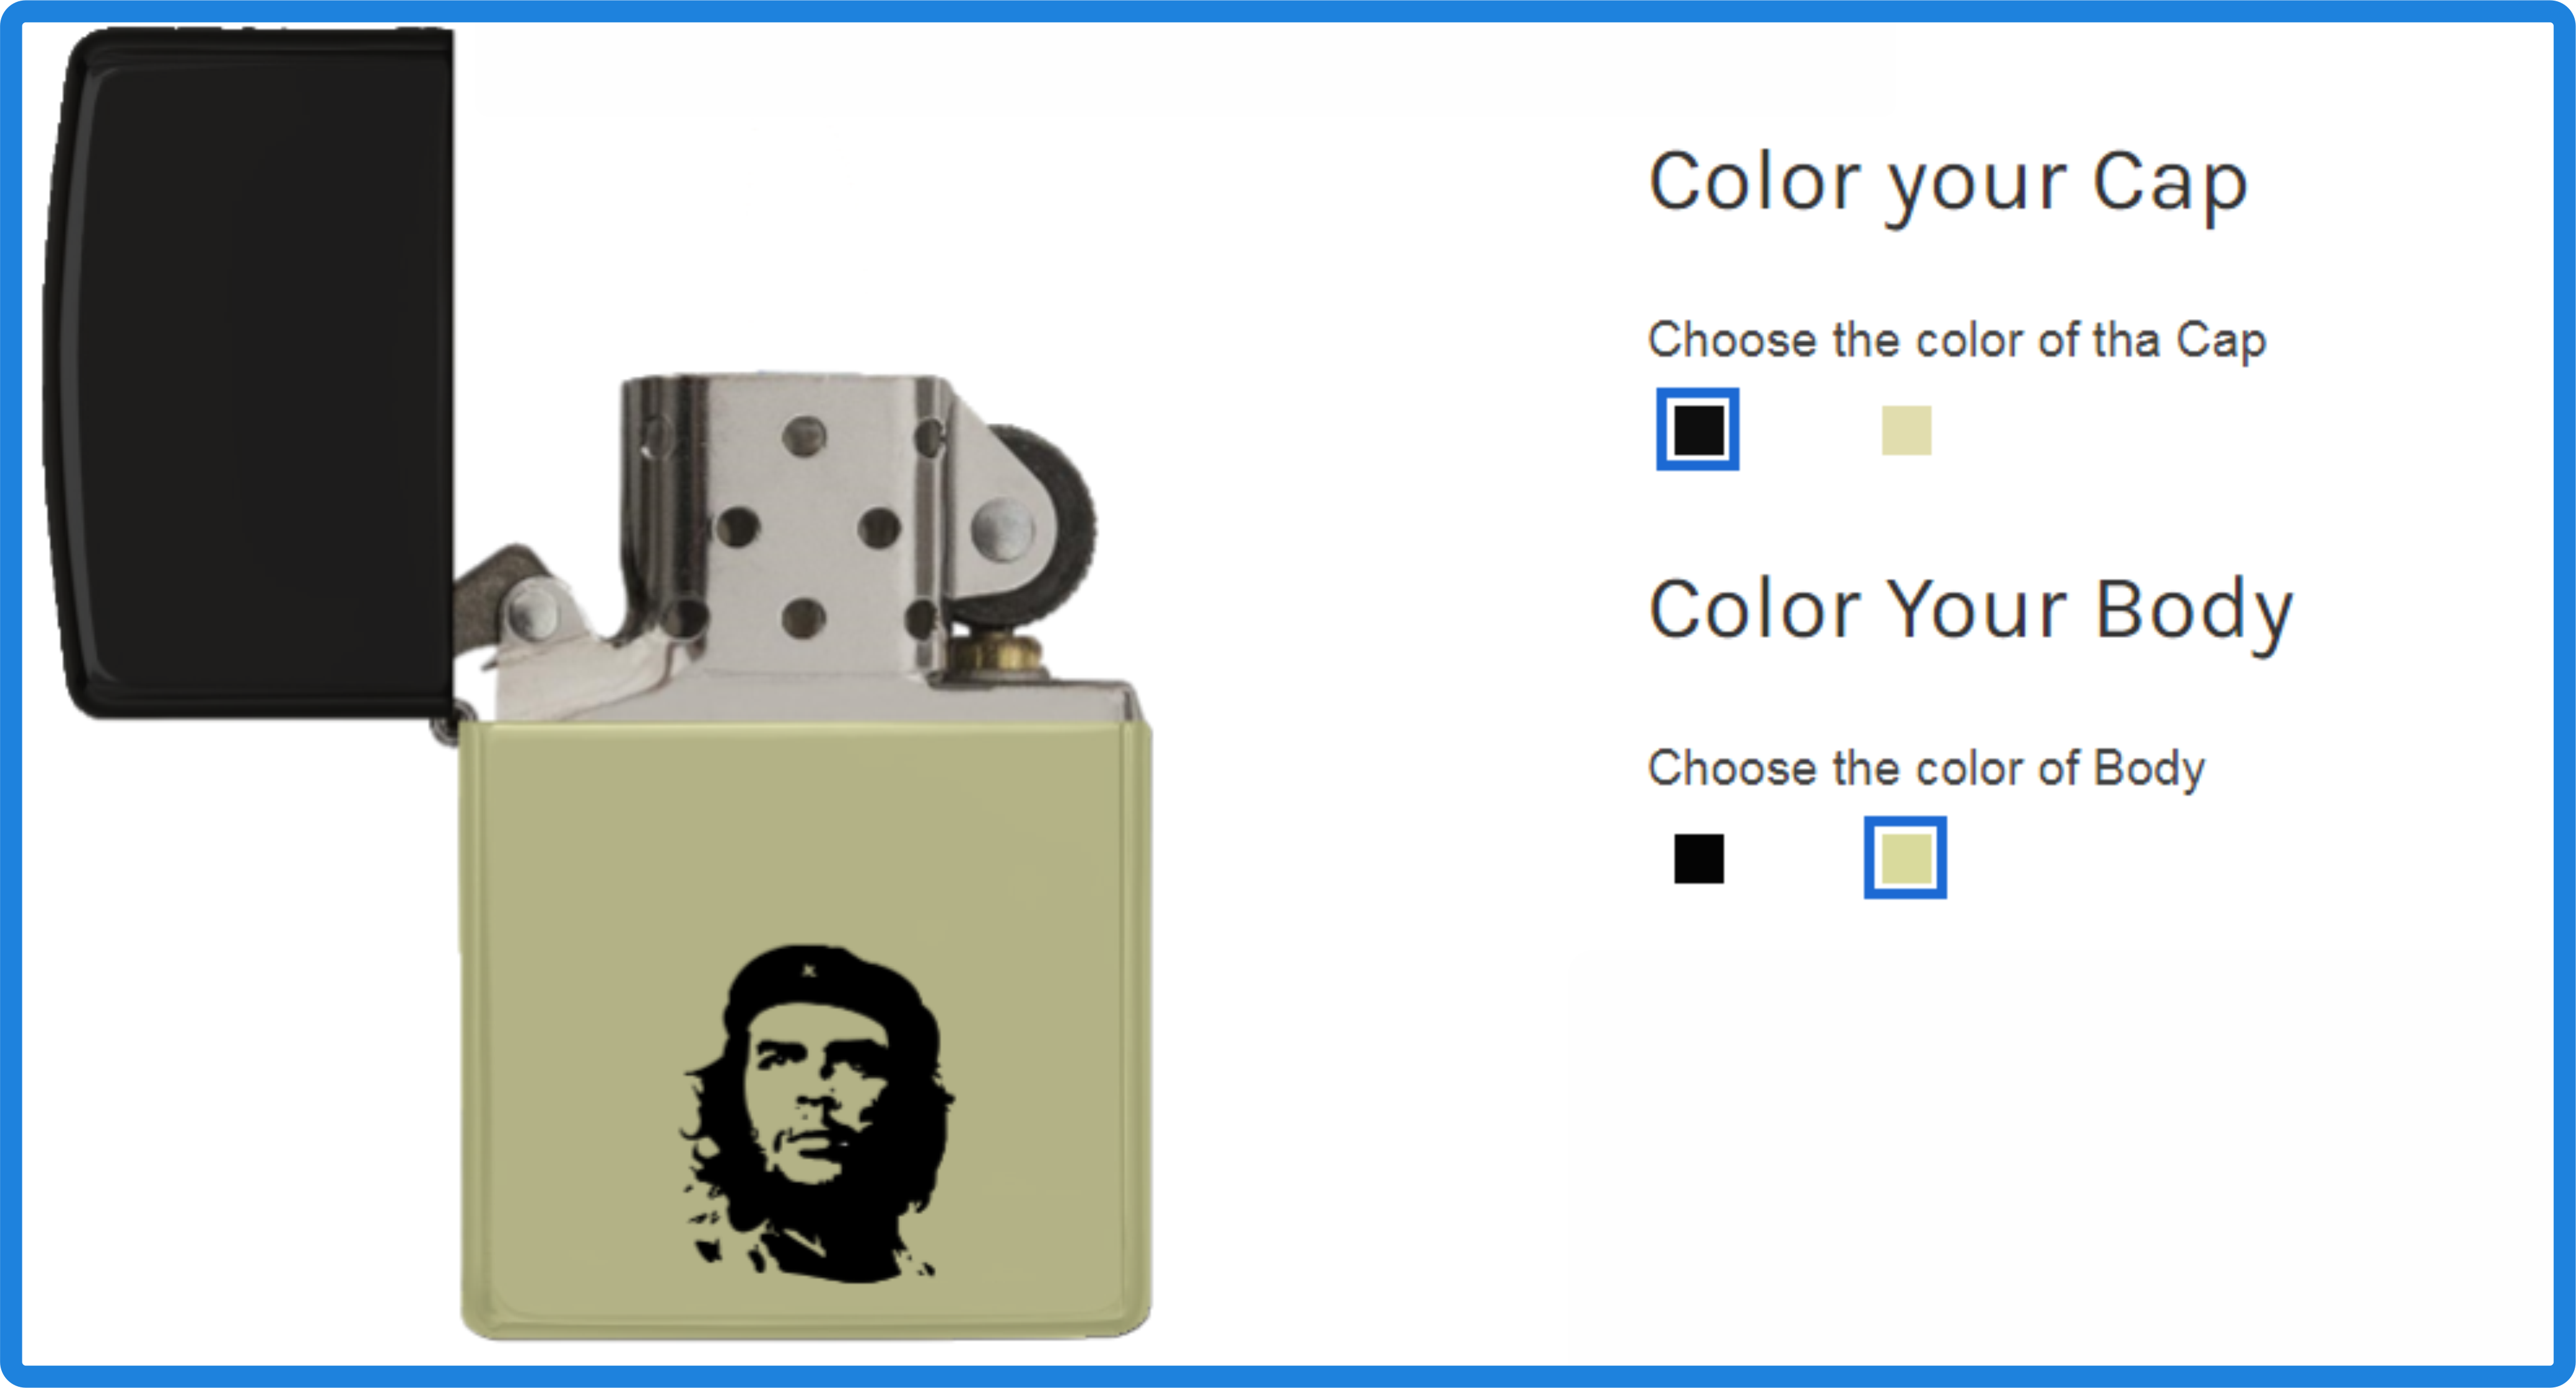
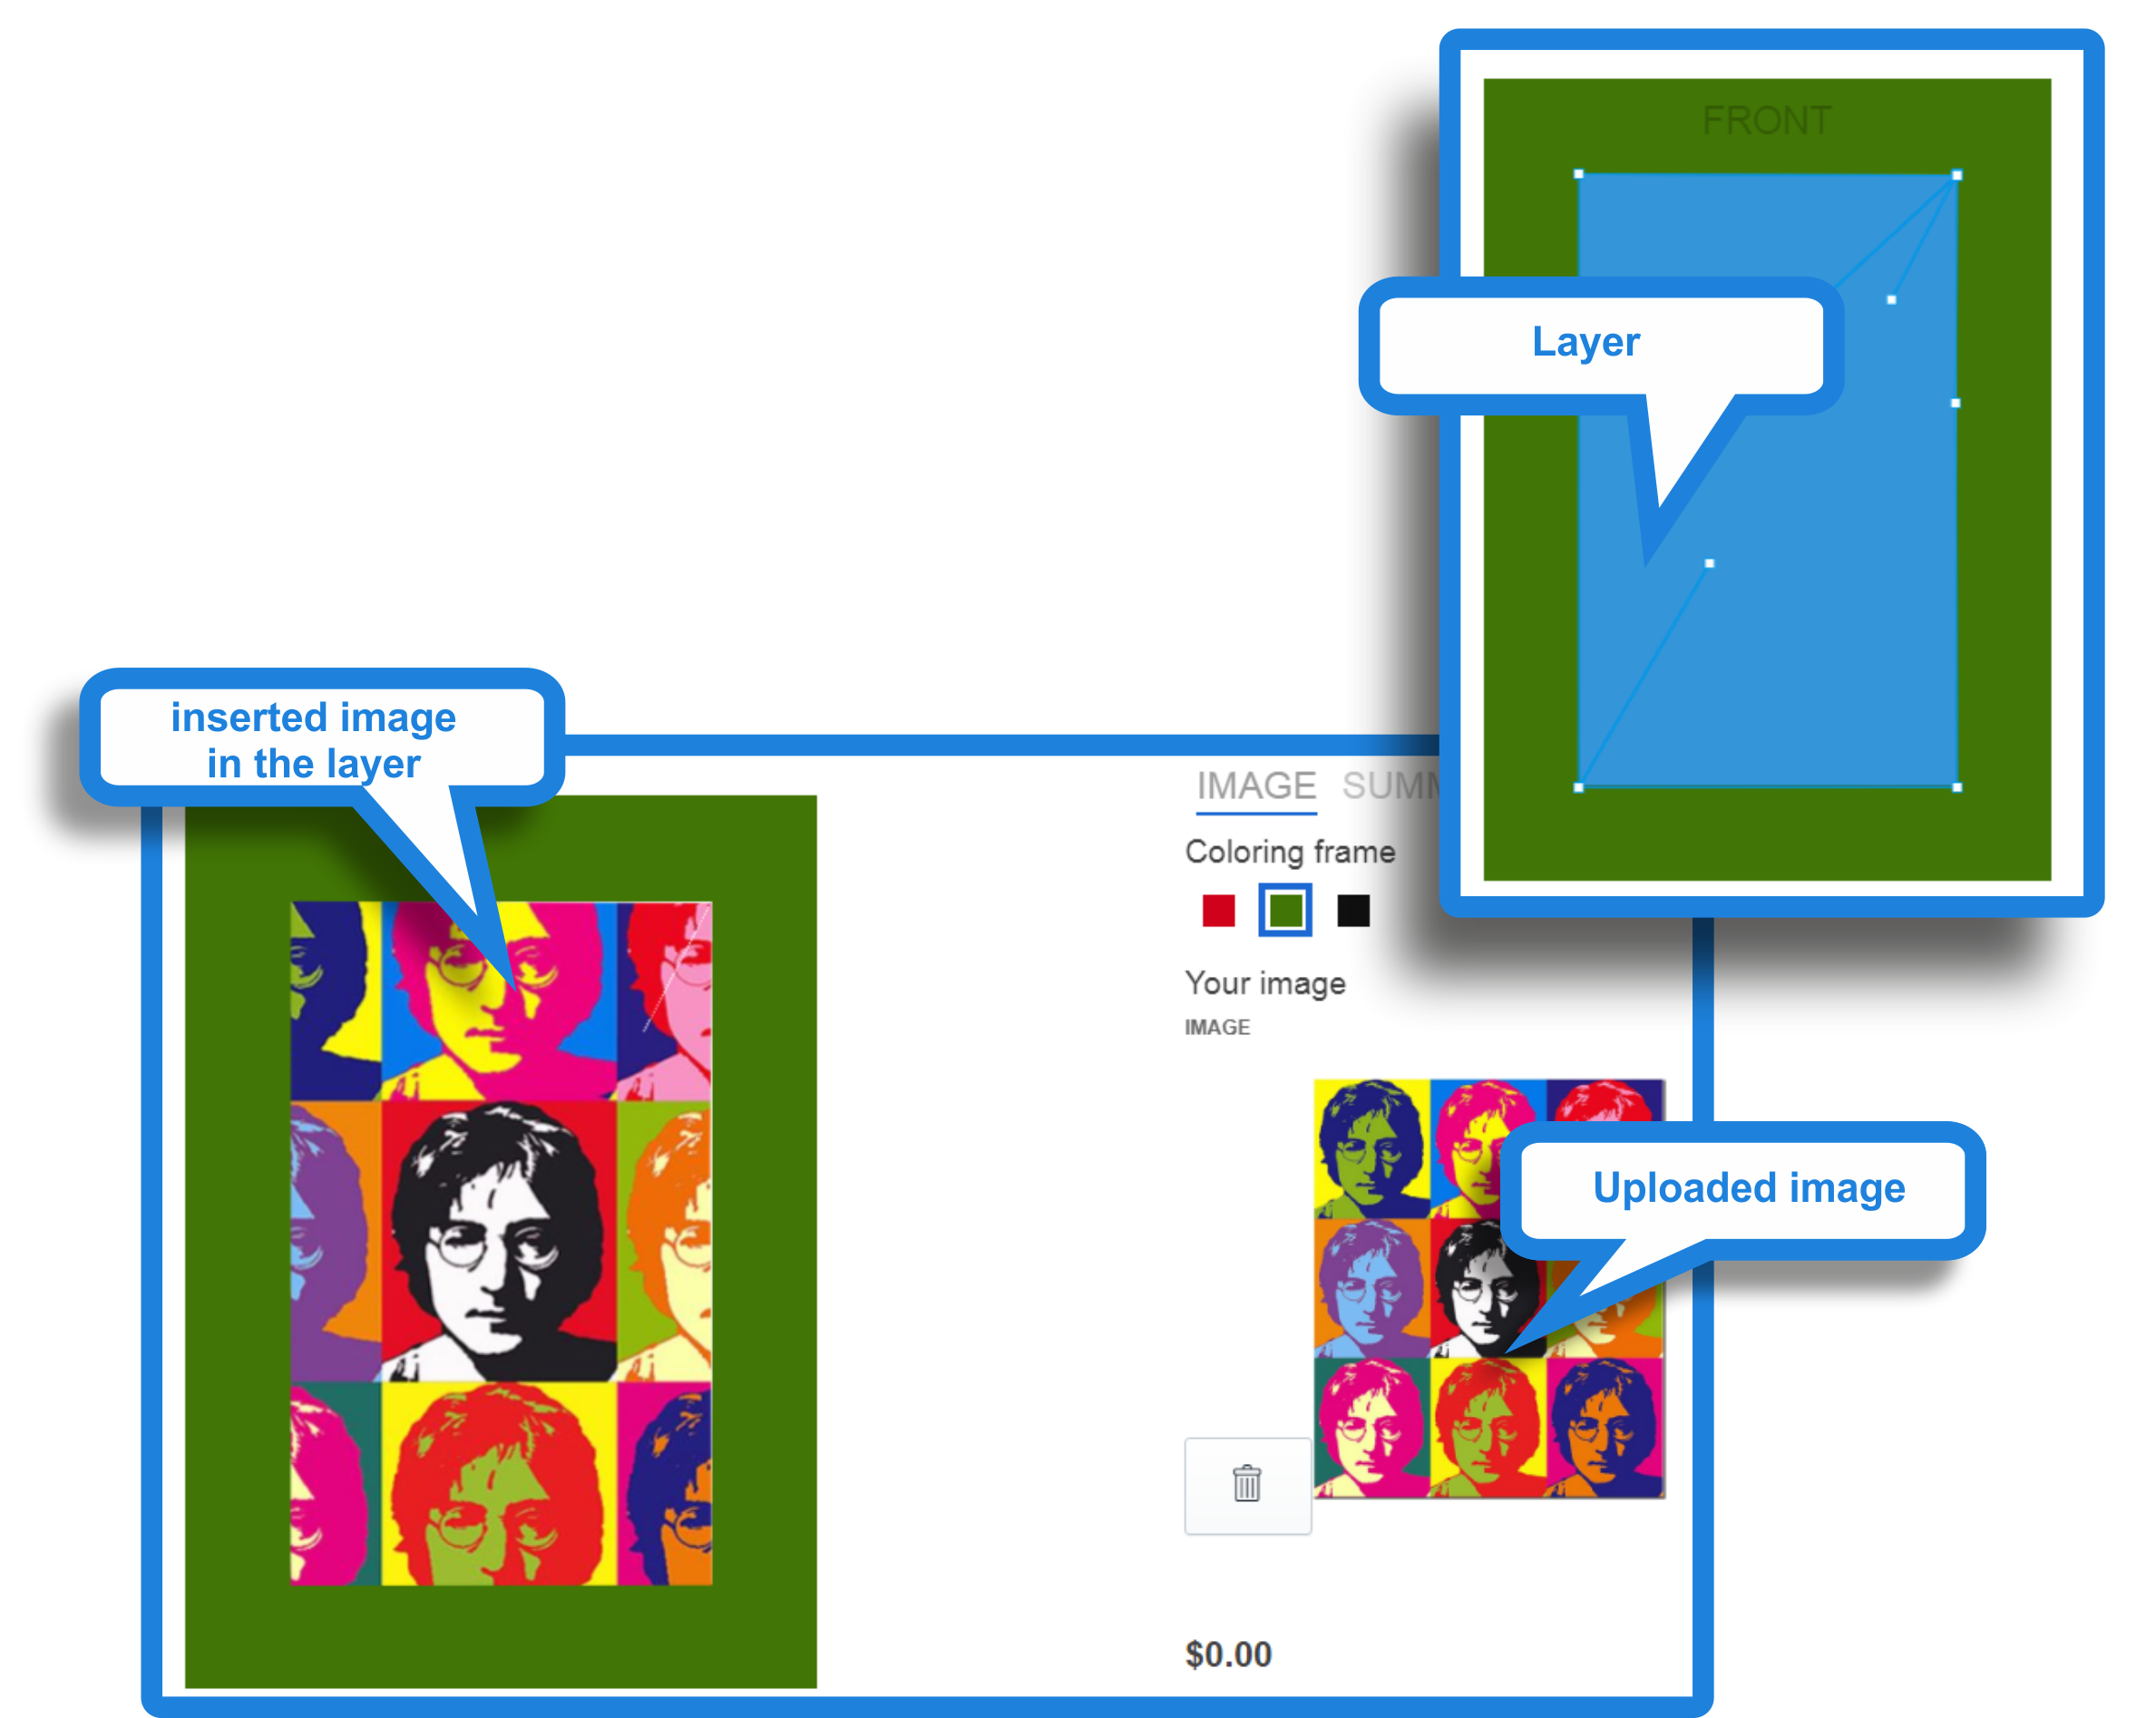
Inserting user image
- Create a new custom layer with “Path” type. How to do this, see the tab “Custom Layers”.
- Create a new Panel with the “File upload” category and add file upload option.
- Enjoy the result
[/vc_column_text][/vc_tta_section][vc_tta_section title=”Text rendering” tab_id=”1541603586001-150ba9dd-210c”][vc_column_text]
Custom user text
With the help of this instruction you can not just add text, but give the buyer the opportunity to choose from the options for color, size and font. We present you a powerful tool for working with text layers.
One color, one font, one size.
For most interesting ideas, you do not need more than one type of font design. And you need to perform just a couple of simple actions.
- Create a new custom layer with “Text” type. How to do this, see the tab “Custom Layers”.
- Create a new Panel with the “Text field” category and add text field option.
- Enjoy the result
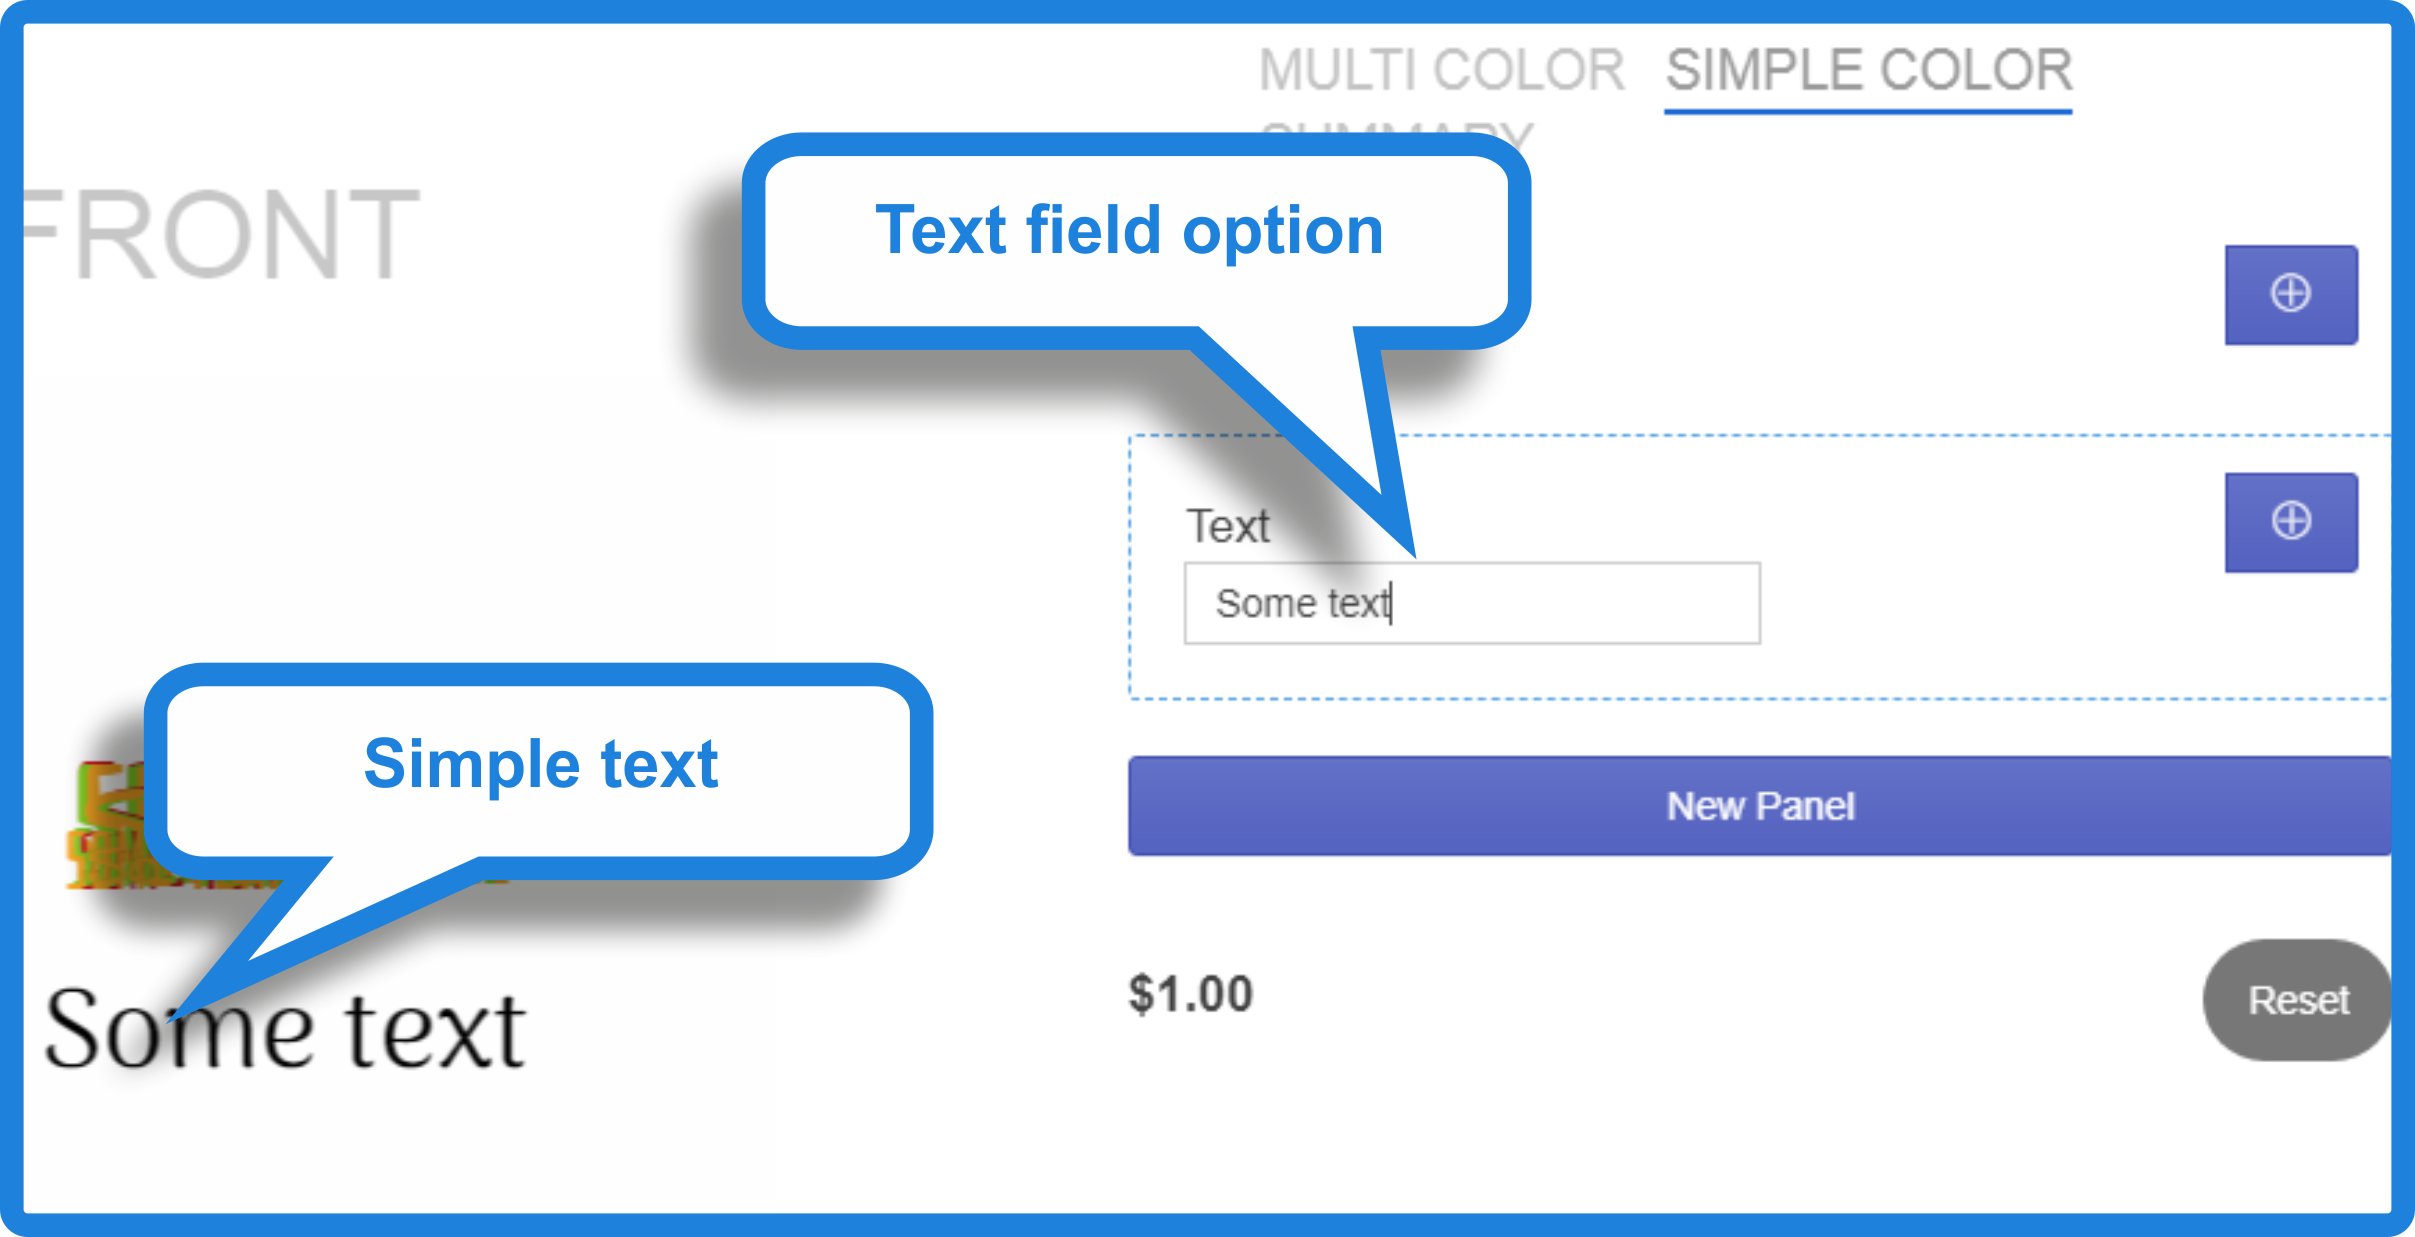

An example can be viewed from this link. The “Simple color” tab.
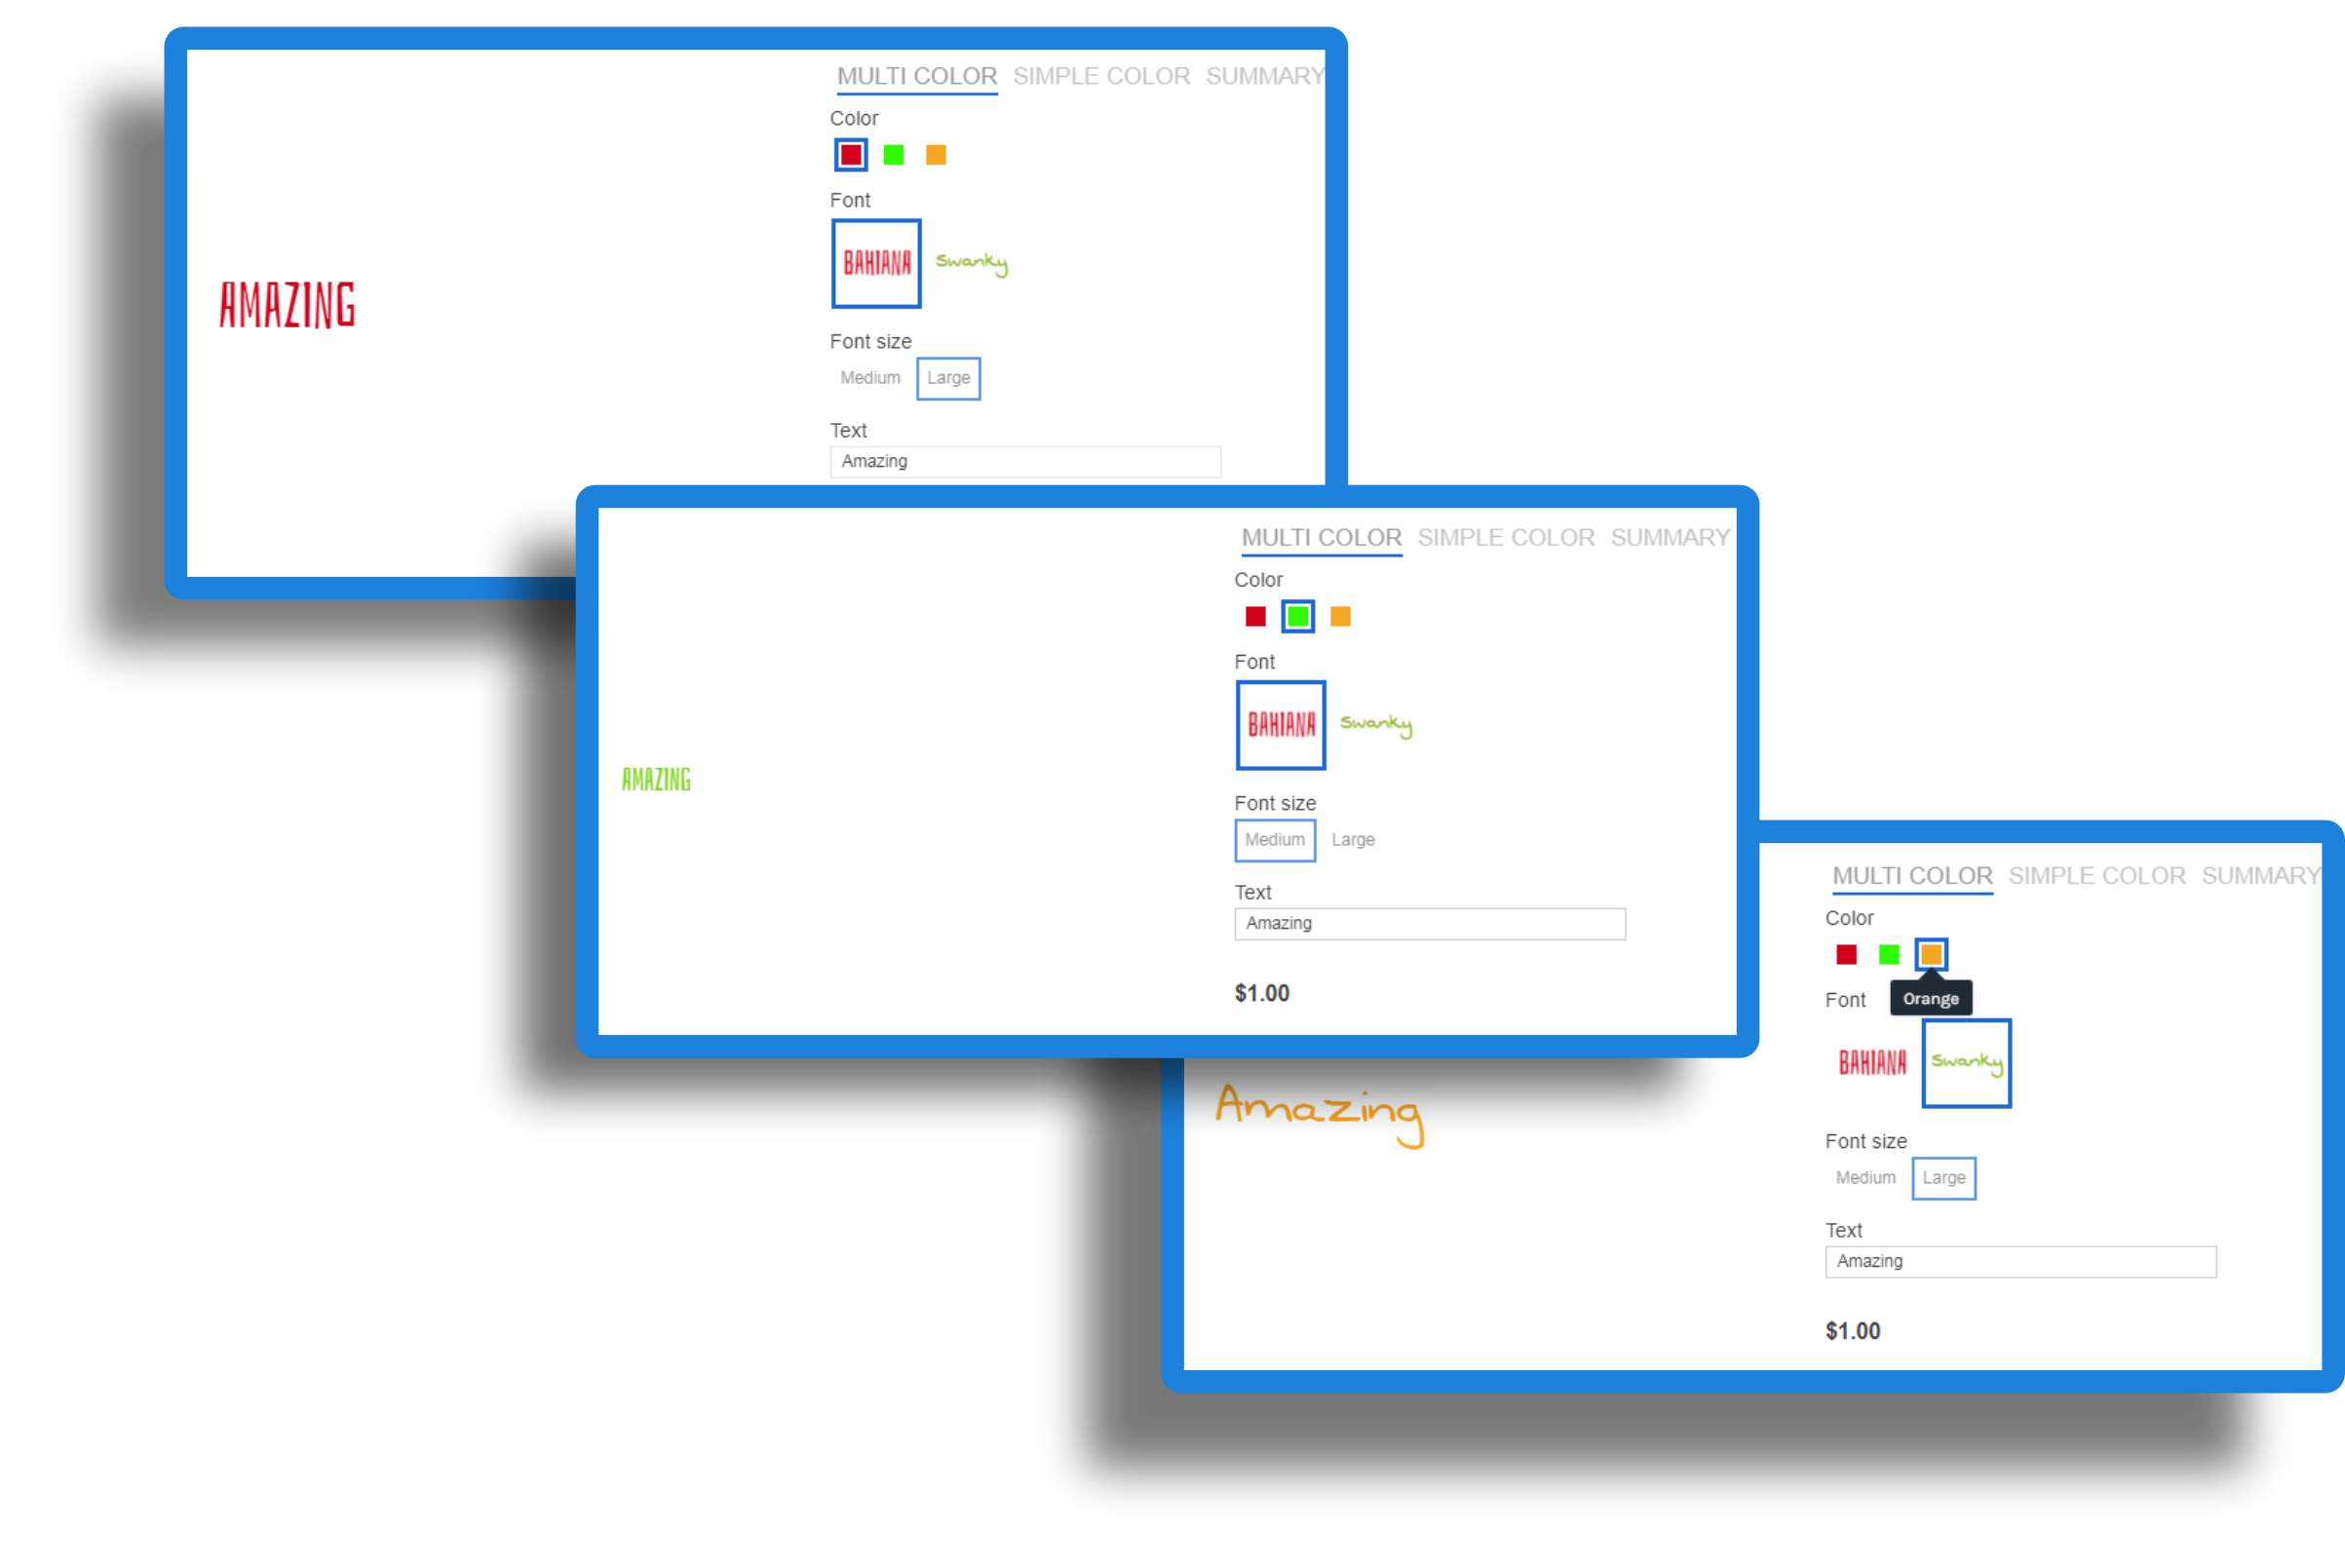
Multi color, multi font, multi size.
Sometimes it is necessary that there are a lot of fonts, colors and the possibility of resizing. In this situation, it takes a little longer, but the result is worth it.
- Create a new custom layers with “Text” type. For each color a separate layer. For each font a separate layer. For each font size a separate layer. How to do this, see the tab “Custom Layers”.
- Create a new Panel
- For color switching create a new “Color thumbnail” category and add color thumbnail options.
- For font switching create a new “Image Thumbnail” category and add image thumbnail options with uploaded samples of font images.
- For size switching create a new “Text list” category and add text list options.
- Create a new Panel with the “Text field” category and add text field option.
- Set up the rulers in each Custom Layer
You need to make Custom layer shown if the user selects the desired color, size and font

An example can be viewed from this link. The “Multi color” tab.
This description is just an example. The way you set it up depends entirely on your imagination.
For better understanding the process of creating custom text please watch the following videos:
<!– First, create a new custom layer


–>